ContentGrid has 2 main web interfaces. One of them for managing applications, is called the Console.
The web UI for using ContentGrid applications is called Navigator.
This guide will walk you through the initial steps of setting up your organization, creating a project, and starting
with data modeling in ContentGrid.
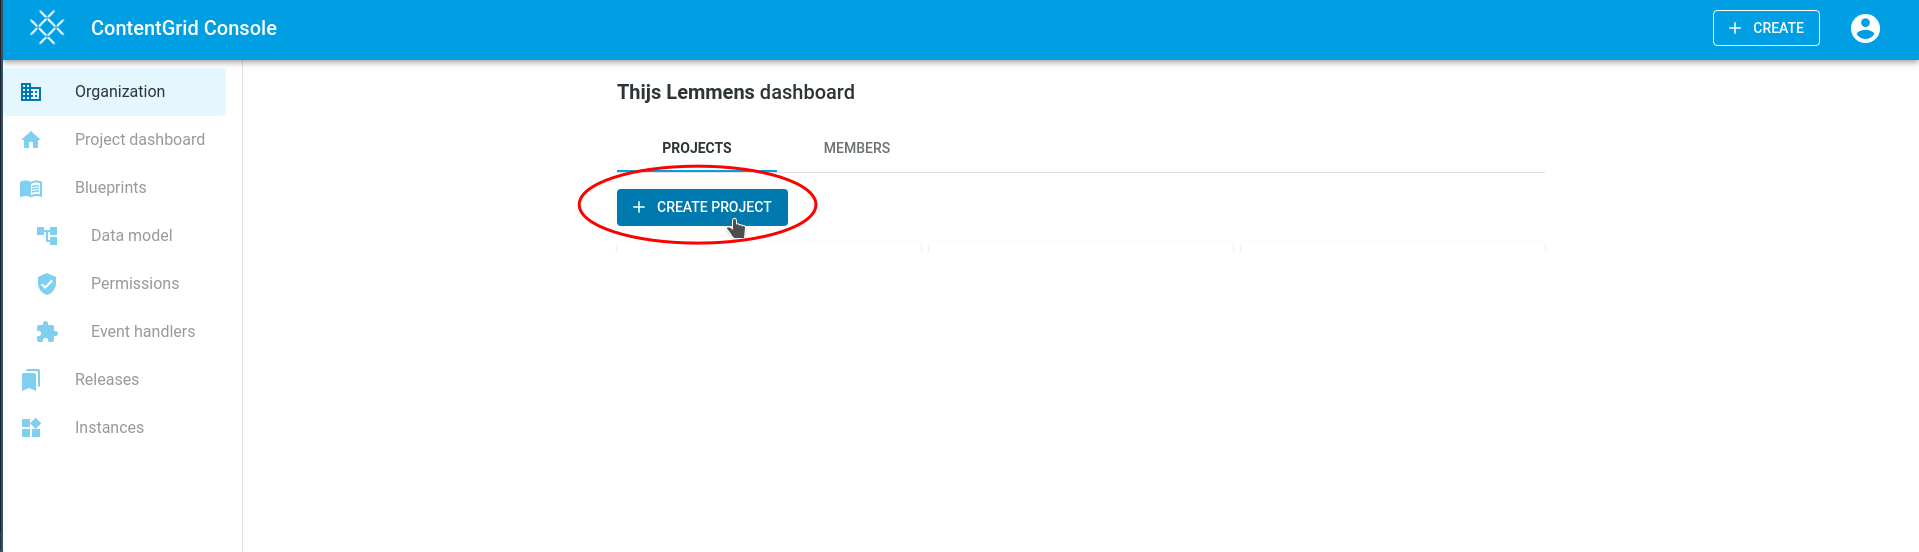
1. Create an Organization
Before you can create a data model, you need to have an organization.
On the main page, click the Create Organization button.
Follow the prompts to set up your organization.
If you already have an organization, you can skip this step.
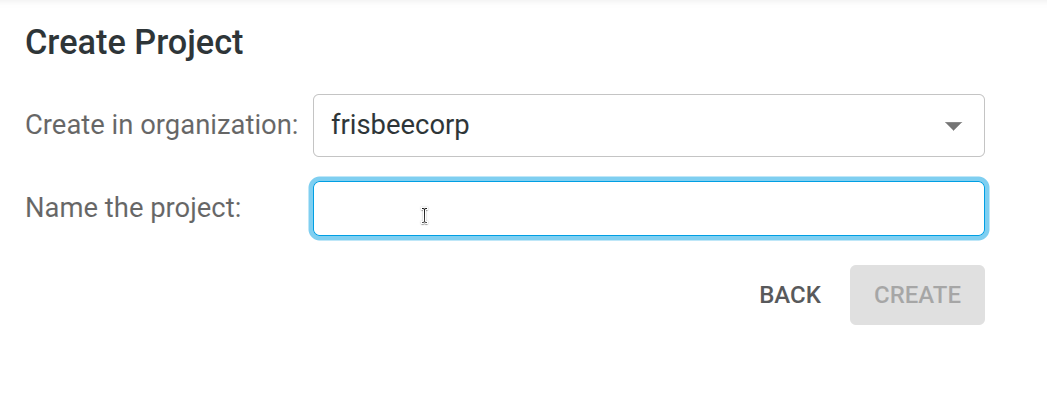
2. Create a Project
Once your organization is set up:
Navigate to your organization page.
Click the Create Project button.
In the dialog, enter a name for your project and confirm.
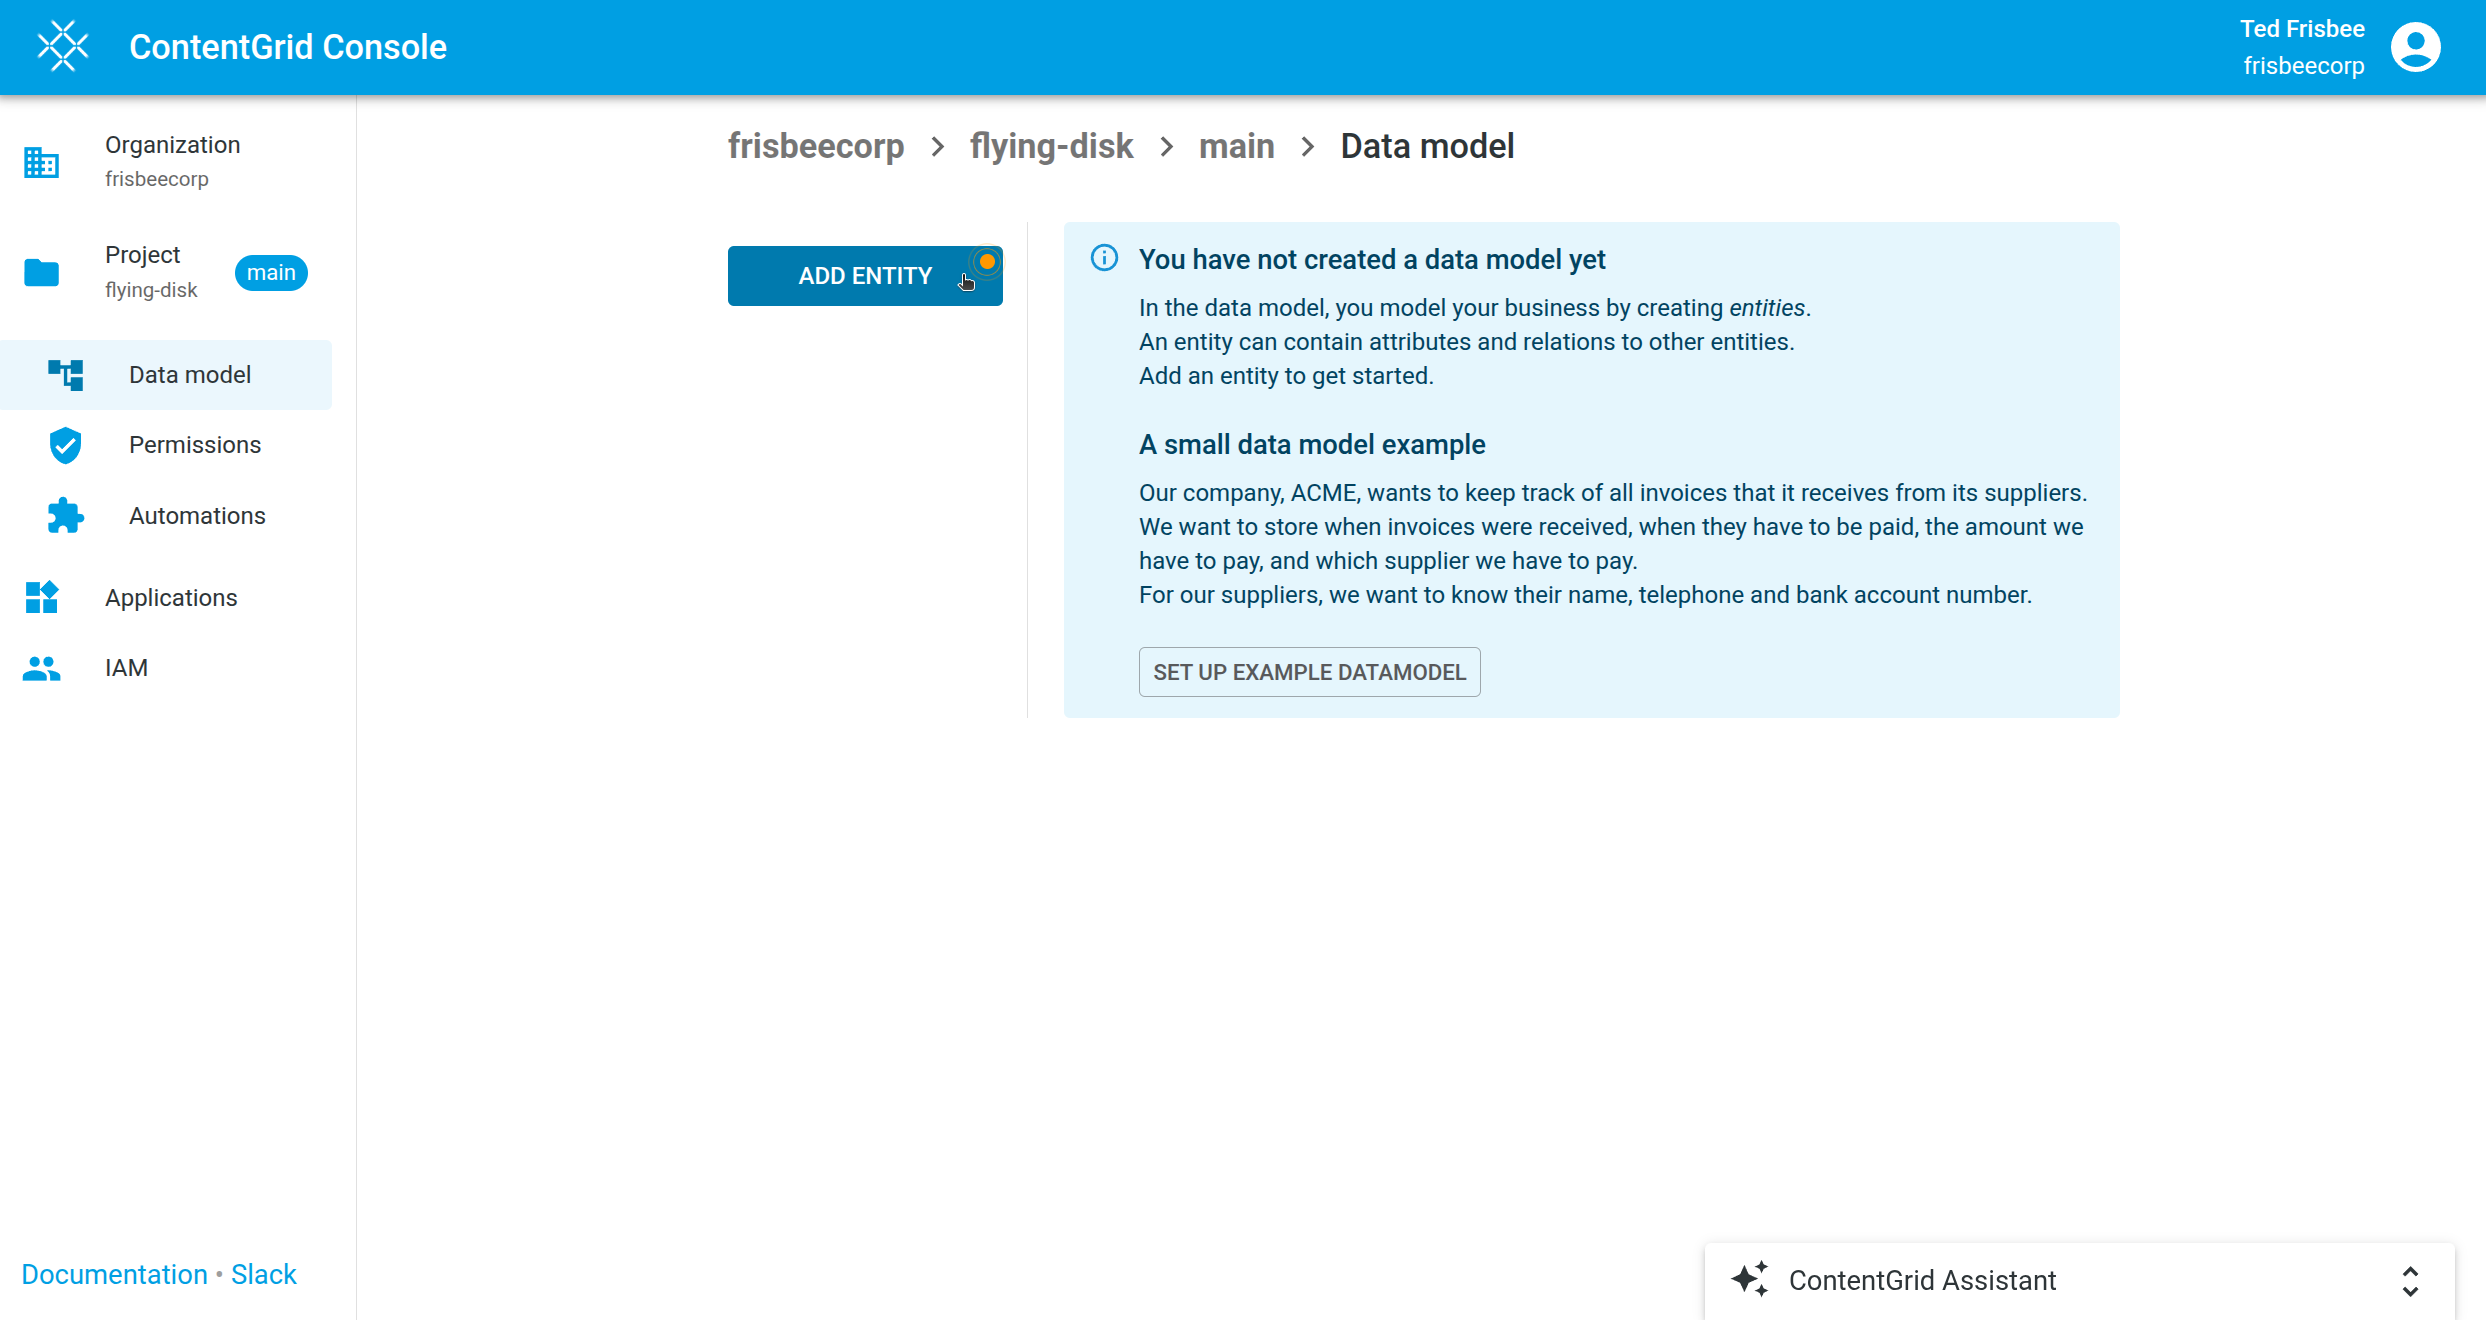
3. Start Data Modeling
Now you can begin modeling your data:
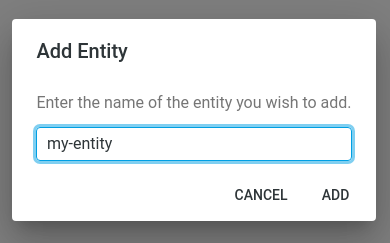
Click the Add Entity button to start creating your first entity.
In the Data model tool, you can model your business entities. Click Add Entity, provide a name, and
optionally a description. Providing a useful description is a good practice and can help some of the AI features in
ContentGrid work better.
After creating your first entity, you can edit its name or delete it if needed.
Entities, Attributes, and Relations
Entities can have attributes and relationships to other entities.
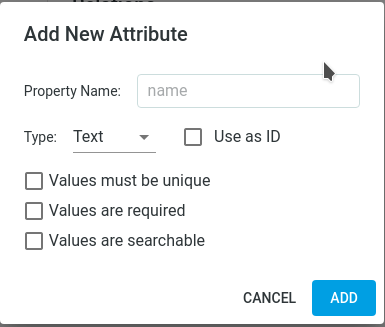
Add an Attribute
Within an entity, click Add Attribute.
A dialog will appear with the following options:
Property Name: A unique name within the entity.
Type: The data type for this attribute. Options include:
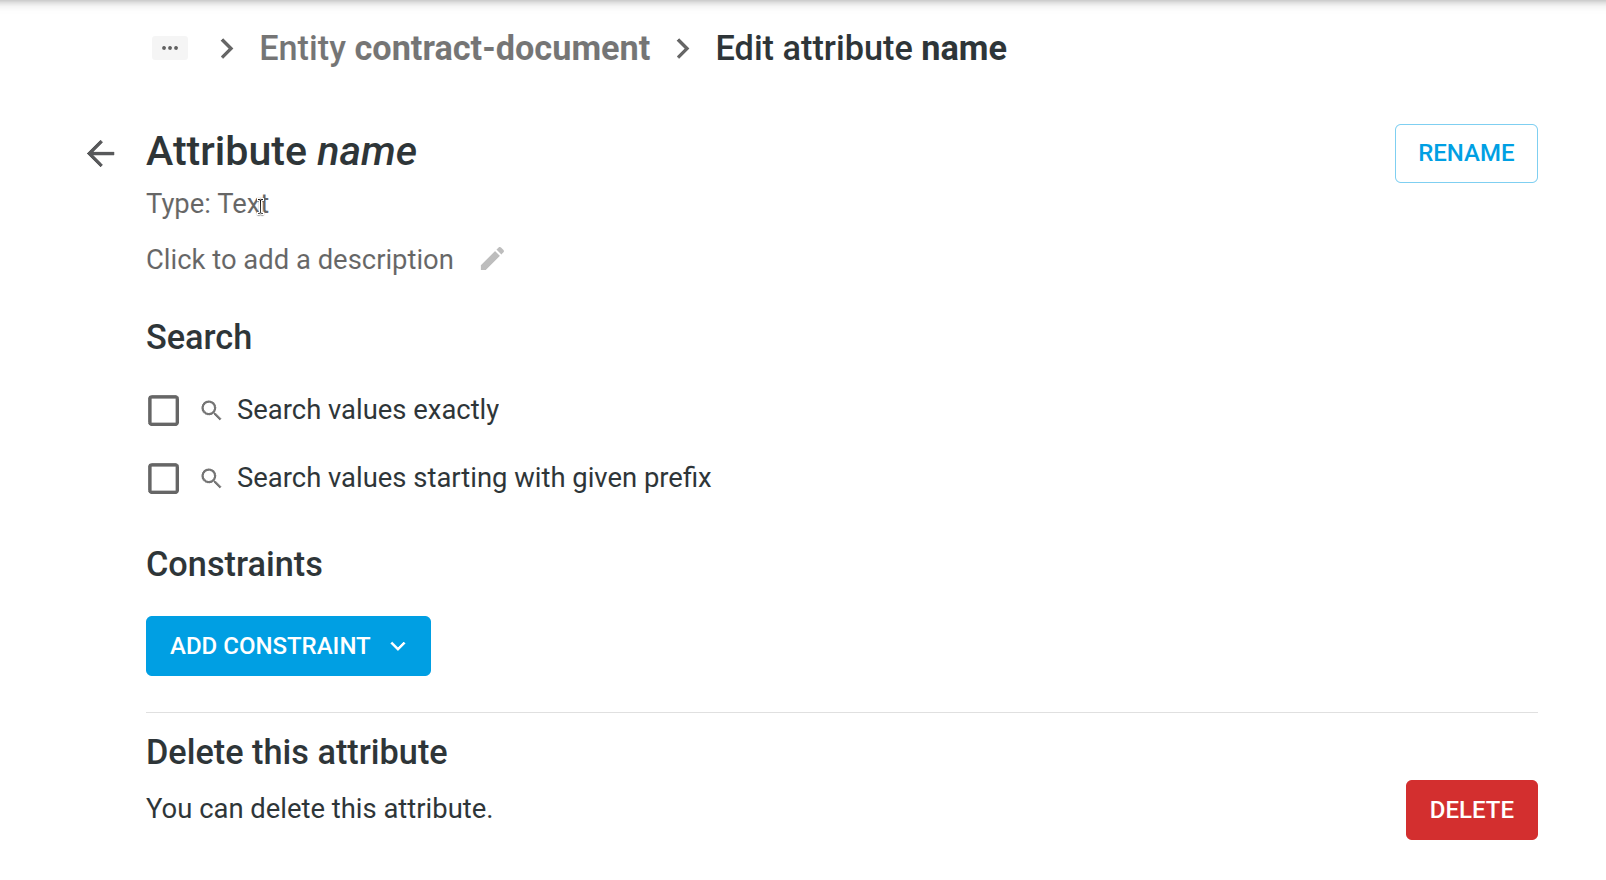
After creating the attribute, you can edit it further:
Name: Rename the attribute.
Description: Add a description to help users and AI agents.
Search Options:
Search values exactly: Values must match exactly when searching (useful for status, category, etc.).
Search values starting with given prefix: Values can be searched by prefix (case- and accent-insensitive; useful
for names, titles, etc.).
Constraints:
Value is required: Attribute must have a value for the item to be created.
Must be unique: Attribute value must be unique across all items.
Set allowed values: Provide a list of allowed values; only these can be used.
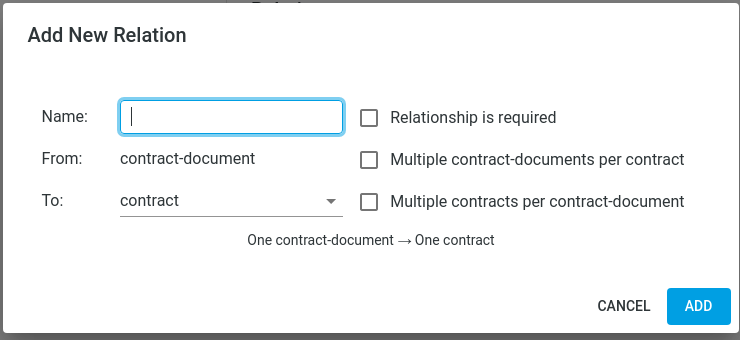
Add a Relation
You can model relationships to other entities (or to the same entity):
Click Add Relation.
In the pop-up dialog, configure the following:
From: The current entity.
To: The target entity for the relationship.
Name: Name of the relationship.
Description: (Optional) Description for the relationship.
Cardinality: Cardinality of the relationship (e.g., one-to-one, one-to-many). Choose the checkboxes that apply.
Relationship is required: Check if this relationship must always exist.
Permission Policies
ContentGrid takes a different approach to permissions than legacy content management systems. Instead of making a complex hierarchical tree structure
of permissions with inheritance, a set of permission policies describes access for each entity. These policies
are rules that contain logical expressions, making use of (a combination of) entity attributes and user attributes.
How to create a Policy
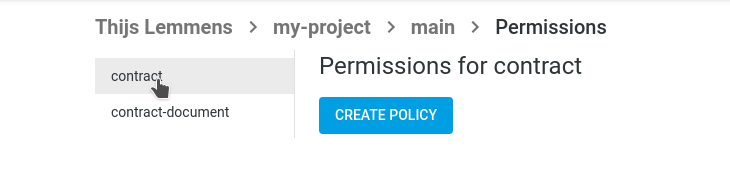
First, go to the Permissions modeler:
To create our first policy, we first have to choose the entity for which we are going to create a policy:
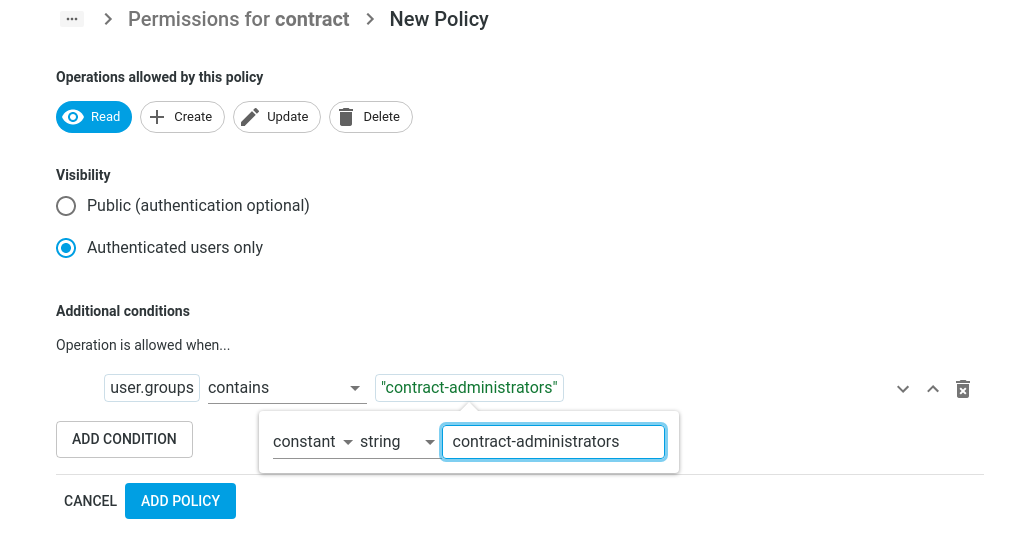
When clicking the “Create Policy” button you will see the configuration options for creating a new policy:
First, you’ll have to choose for which operation this policy will be evaluated. The options are: Read, Create, Update, Delete.
You can choose one or more operations.
By choosing the visibility setting, you can define if this policy is applicable for authenticated users only, or for all users.
The “Additional conditions” section is where you define the conditions for this policy, access to the entity is granted
when the conditions are fulfilled.
Multiple conditions can be applied, and each rule has a left and a right side, that are compared to each other. Both left
and right sides of can be a “user attribute”, “entity attribute” or constant. The possible comparisons between the left and the right
side are:
equals
not equals
greater than
greater or equals
less than
less than or equals
contains
in
You can add more conditions with the “Add Condition” button. All conditions have to be satisfied before a policy grants access.
Save the policy with the “Add Policy” button.
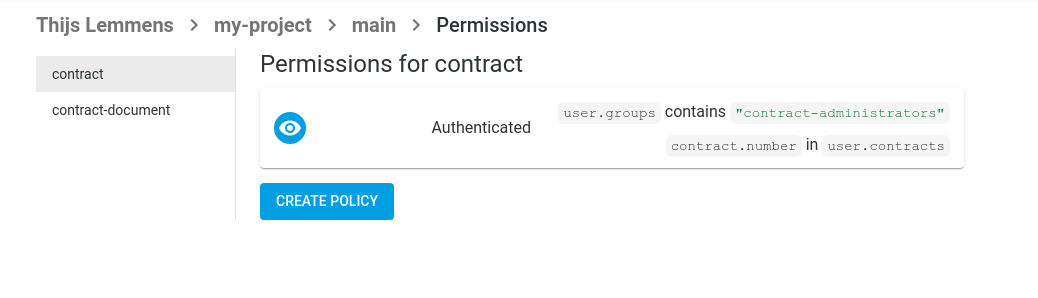
Now, you should see your policy for this entity in the overview.
Webhooks
Tutorial on webhooks
Webhooks are one way that ContentGrid applications can send automated messages or information to external systems.
They are almost always faster than polling, and require less work on your end.
Each mutating operation on an resource is handled individually and is asynchronously, but almost immediately delivered to the configured webhook endpoint.
A ContentGrid Webhook
is always attached to a ContentGrid entity and selected change triggers
is delivered to a configured HTTP endpoint
is delivered as a HTTP POST message with a body payload and specific ContentGrid HTTP headers
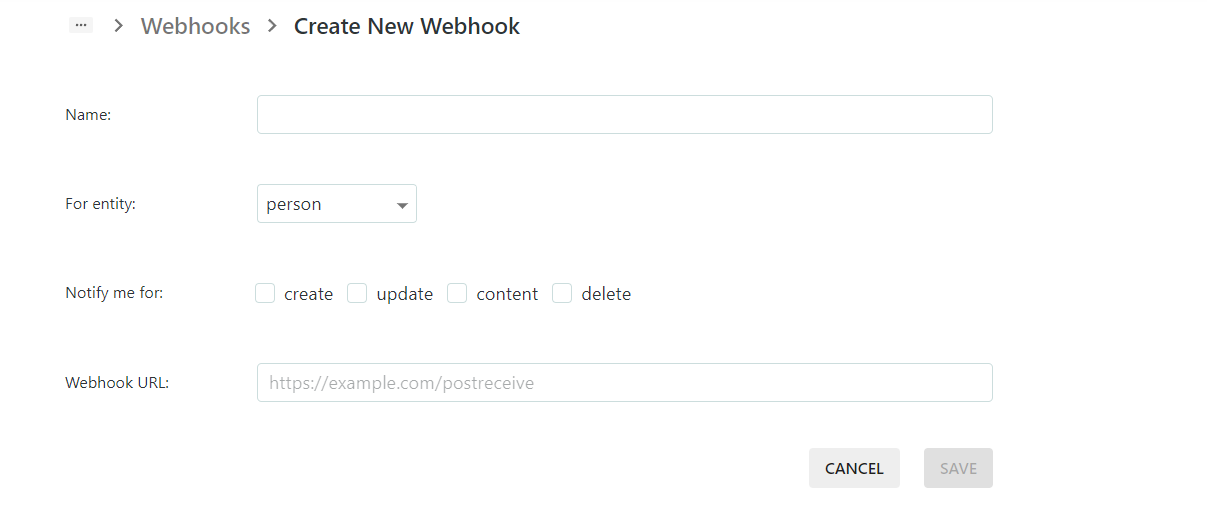
Create New Webhook?
First, go to the Webhooks modeler:
To create our first Webhook, we first have to click on Create Webhook:
When clicking the “Create Webhook” button you will see the configuration options for creating a new Webhook:
First, you will have to give a satisfying Webhook name (or description).
Then you have to choose for which entity this Webhook will be applied
After the entity selection, select the notifications triggers, where the options are
create (whenever the selected entity type is created)
update (when each existing entity is being updated)
content (when a document content has been changed)
delete (when the enetity selected has been deleted)
As a last step, you have to provide the Webhook URL to be invoked by your ContentGrid application
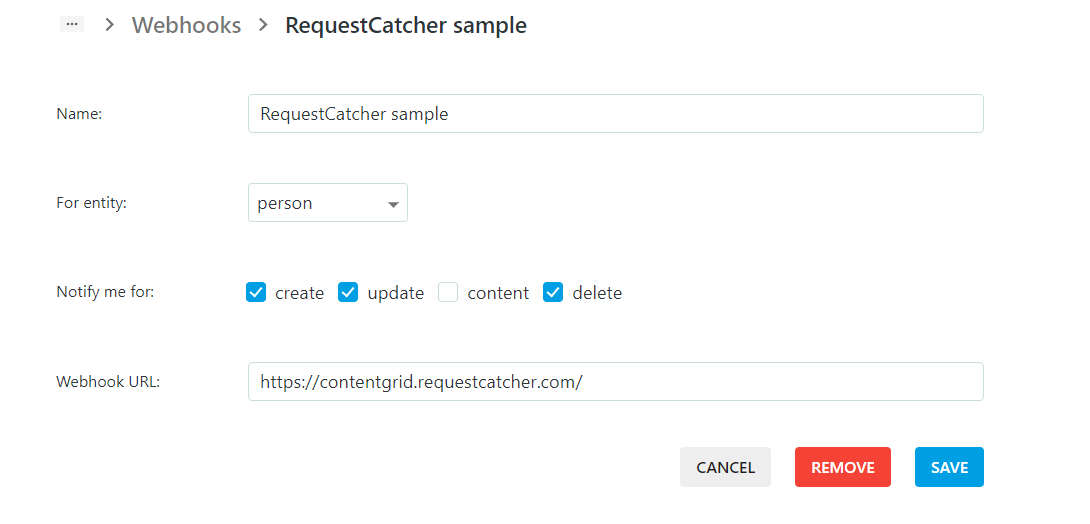
After clicking save, the Webhook is saved and is listed in the overview but will only be available to your ContentGrid runtime application once you create a new release.
You can add more Webhooks with the “Create Webhook” button.
Webhook endpoint
A Webhook endpoint has some specific constraints and must respect the following implementation details:
it has to support the HTTP POST method
should accept a JSON body and application/json Content-Type
can use our ContentGrid HTTP headers in order to validate that the delivered message is coming from our platform
User-Agent value is ContentGrid-Slingshot/APP_VERSION
ContentGrid-Application-Id contains the application id
ContentGrid-Deployment-Id contains the deployment id
ContentGrid-Signature provides a JWT signed by the our platform that should be used in order that the message is actually sent by the ContentGrid platform
Security and validation
ContentGrid signs JWTs using asymmetric encryption (RS256), and publishes the public signing keys in a JWKS (JSON Web Key Set).
The signing keys are rotated on a regular basis.
We discourage doing manual JWT validation since it might be easy to improperly implement and miss some important details that will lead to serious security vulnerabilities. Most JWT libraries take care of JWT validation for you.
We also highly recommend to use a JWK library for the programming language of your choice.
One of the benefits of JSON Web Token (JWT) is that you can validate a token using an easy cryptographic operation.
What are JWKs?
A JSON Web Key (JWK) is a JSON data structure that represents a cryptographic key. JWKs are a set of keys shared between different services and are used to verify the JWT token from the authorization server.
You should only be validating the received JWT against ContentGrid Json Web Key (JWK) URL which is ${CONTENTGRID_URL}/.well-known/jwks.json
We use JWKS to expose the public keys used by the ContentGrid platform to all the clients required to validate signatures.
kid: is Identifier of the static key used to sign the JWT
alg: Algorithm used to sign the key
aud: Recipients that the JWT is intended for (the CG Application URL)
iat: The issuing time of the token in seconds
exp: The expiration time of the token in seconds
jti: Unique identifier of the token
Get the signing keys
Here is a Java exmaple of how to validate a JWT using JWKs with Nimbus JOSE + JWT
To validate the token, first, you need to get the JSON web key set from the JWKs endpoint. The token will be received as JSON in the validation endpoint in the body.
ConfigurableJWTProcessor<SecurityContext> jwtProcessor =new DefaultJWTProcessor<>();
jwtProcessor.setJWSKeySelector(jwsKeySelector);
jwtProcessor.setJWTClaimsSetVerifier((claims, context) -> {
final Date now =new Date();
final Date exp = claims.getExpirationTime();
if (exp !=null) {
if (now.after(exp)) {
thrownew BadJWTException("expired");
}
}
});
This short guide provides the basic steps required to locally verify an access or ID token signed by ContentGrid. It uses packages from Nimbus JOSE + JWT for key parsing and token validation,
but the general principles should apply to any JWT validation library.
IAM
Identity and Access Management (IAM) is used to manage users and systems that are allowed to access your ContentGrid applications.
Realms
An IAM realm is an isolated authentication environment. Every organization has access to their own IAM realms, which can be configured from IAM management page in the ContentGrid Console.
An IAM realm for your organization will automatically be created when the first application is created.
Multiple applications within the same organization can be connected to the same IAM realm, even across different projects.
The IAM realm authentication is fully separated from the ContentGrid Console authentication mechanisms.
To access an application, you will need to create a User in the IAM realm. You can not use your ContentGrid Console user to access any application.
Attributes
ContentGrid Permission policies make use of attributes to define access rules.
The IAM Attributes for a realm can be configured in the “Attributes” tab. Once an attribute is added, it becomes available for usage in permission policies and can be defined on groups.
To promote reuse and transparency of permissions, attributes are configured on groups, and not directly on users.
An attribute has a name, a data type and can be single- or multi-valued.
Admin permission
If you want to write a permission that allows access to admins, you could define an single-valued attribute named admin of type boolean.
You can then create a group which sets this attribute to true, and add all your admin users in this group
Department access
If you want to write a permission that only allows people to see documents belonging to their departments, you can define a multi-valued attribute named departments of type string.
You can then create separate groups for every department and set the departments attribute for each group.
Afterwards, add users to their correct department group(s).
Users
Users are the people that are allowed to log in and interact with Applications.
A user is identified by their email address (which is also used as the username).
When creating a user, an email address, a first and last name must be provided. Unless disabled, an automatic email is sent to the user to set up their password.
To maintain traceability of all actions that are performed on ContentGrid applications, it is not possible to delete a user account. Instead, a user account can be deactivated so they can no longer log in.
After creation, a user can be made member of one or more groups, so they can inherit the attributes from the groups.
Groups
Groups allow you to organize Users and Service accounts based on shared characteristics.
Groups themselves do not participate directly in permissions. The attributes defined on a group are inherited by all users and service accounts that are a group member.
Service accounts
A service account is a non-human principal that is used to allow programmatic integrations with the Application REST API.
A service account is a type of OAuth2 Client, they can be configured in the “Clients” tab.
Note that the secret for a client is only shown once during creation, or when rotating a secret.
Instead of using a username and password, a service account uses OAuth2 Client Credentials to obtain an access token for the application API.
Navigator
ContentGrid Navigator is the out-of-the box frontend for you ContentGrid application. The interface will adapt
automatically to the entities and attributes you have configured.
Guide on how to create new entities with metadata and relations.
Subsections of Navigator
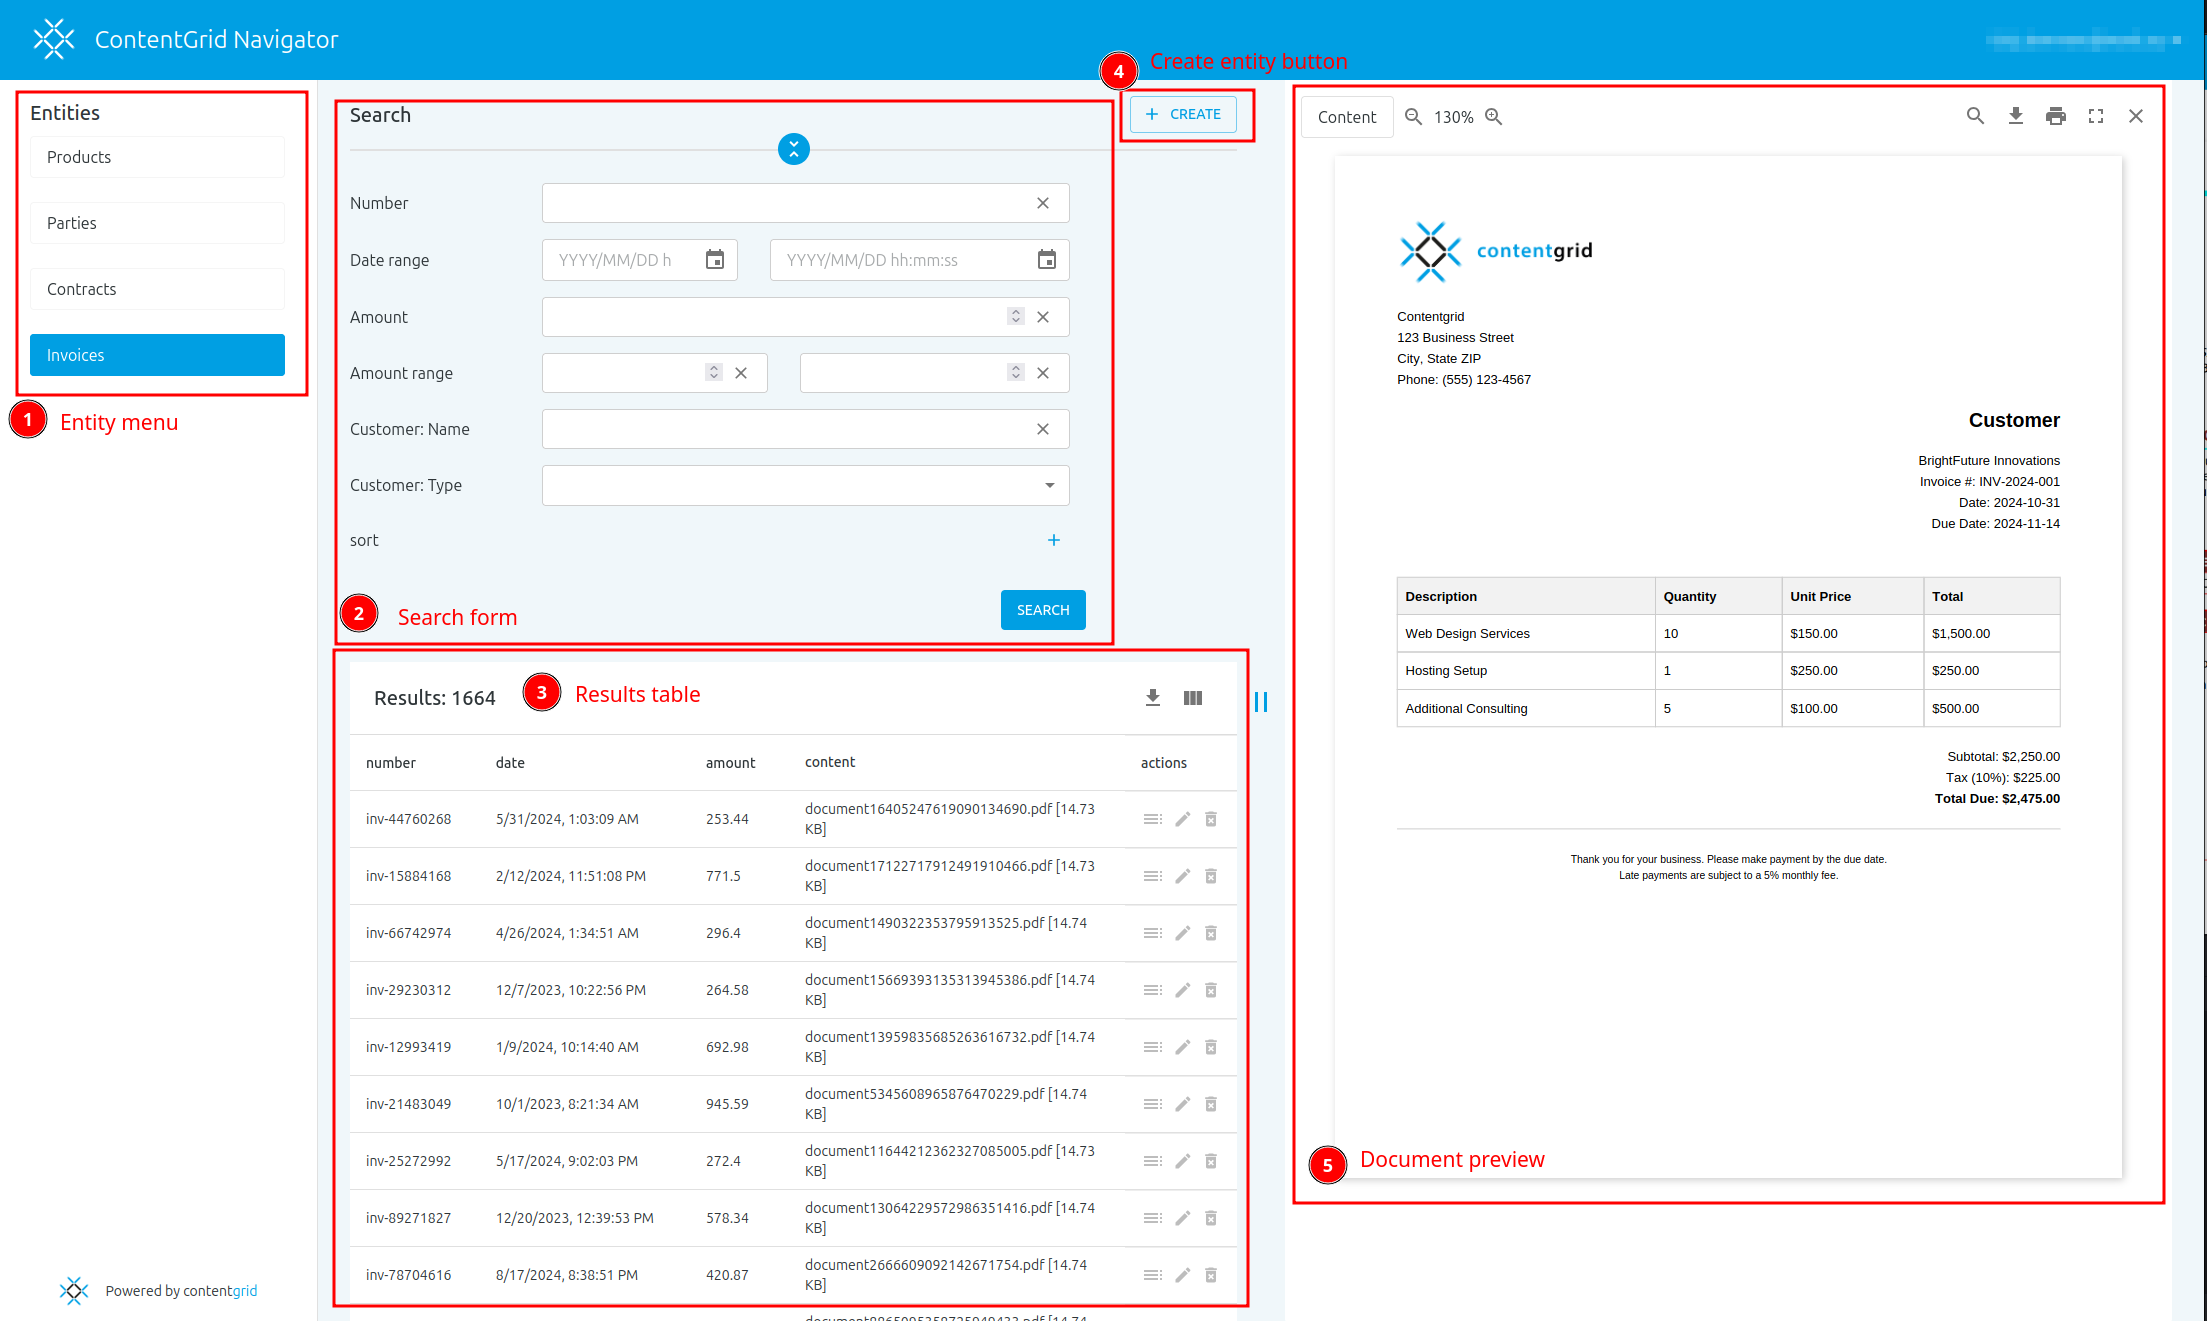
Navigator overview
(1) Entity menu
The entity menu allows you to select an entity type for search and creation. The selected entity is highlighted.
(2) Search form
In the search form you can search on the searchable metadata of the entity and it’s related entities, as defined
in the Console.
(3) Results table
The results table shows up after search and displays the search results as a table with metadata. Clicking one of the
lines in the table will open the document preview.
(4) Create entity button
Clicking the create entity button will bring you to create form where you can fill in the metadata, files and link
the relations for this entity.
(5) Document preview
The document preview will display a preview of the line selected in the results table. If there are multiple files
attached to that entity, there will be a dropdown selector to choose what file you want to preview.
Info
The previewer can natively show PDF’s and images. For other documents, ContentGrid will attempt to transform
the file to PDF.
Currently, these formats are supported for previewing:
pdf
jpg, png
doc, docx, ppt, pptx, xls, xlsx
odt, ods, odp
Of course, other file formats can still be used in ContentGrid, but they don’t have out-of-the-box previews.
Creating entities
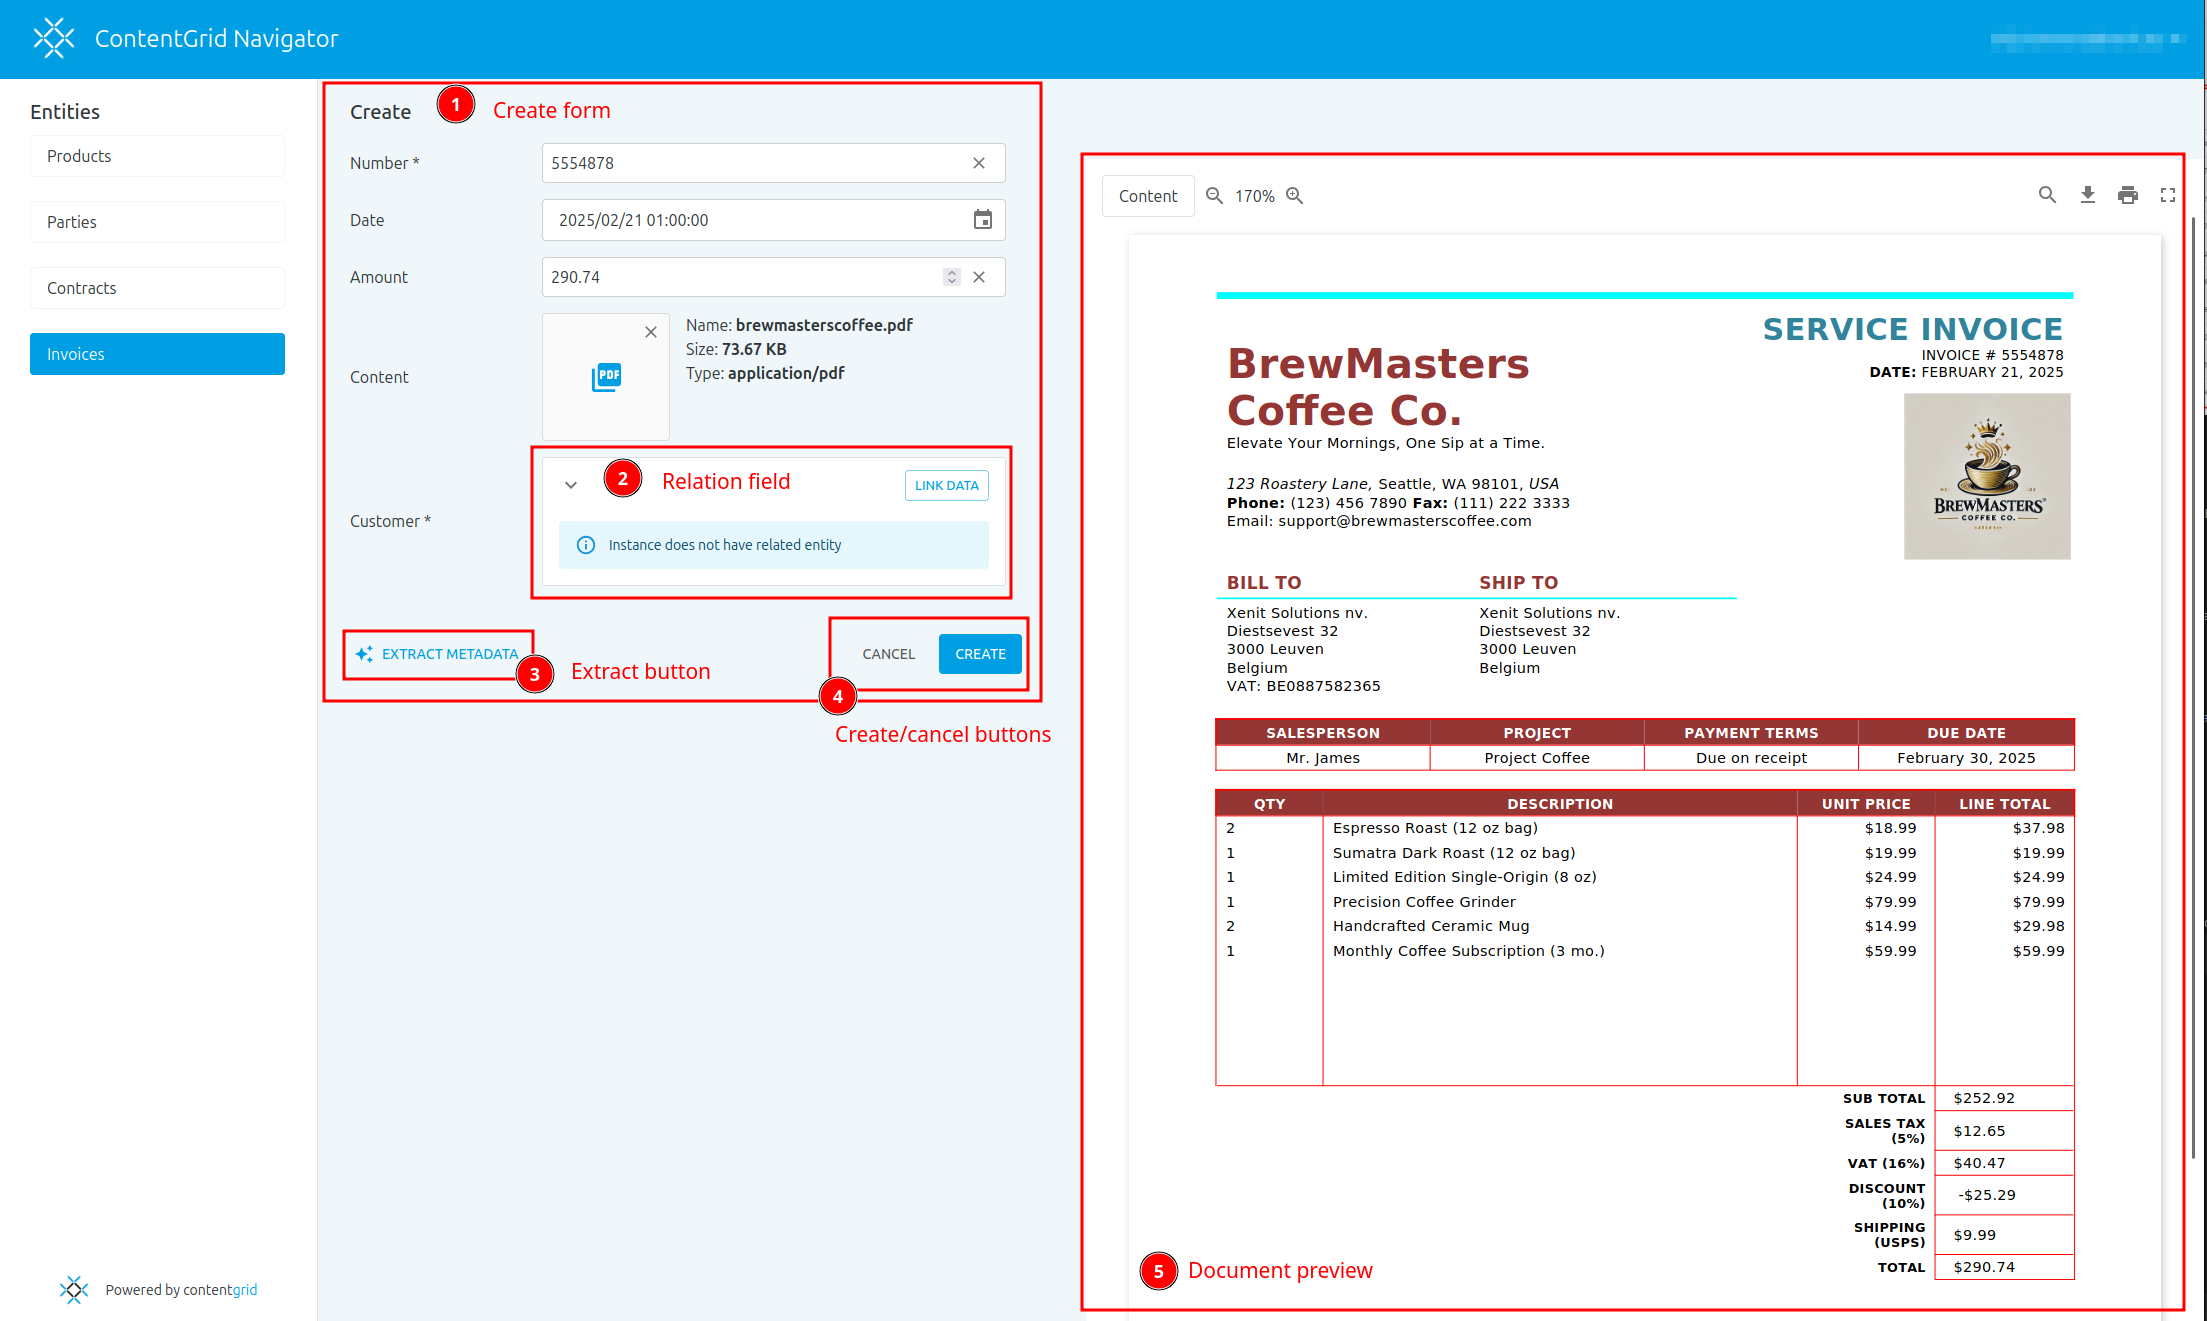
(1) Create form
In the create form you can fill in the metadata fields of the entity you are creating. Mandatory fields are indicated
with an asterisk. Datetime fields have a datetime picker. Content fields support drag and drop and opening a file picker.
(2) Relation field
If your entity has a relation to another relation, you will see that in the form. The link data button will bring you
to the link relation popover where you can link the correct entities.
(3) Extract button
The extract button will open a pop-up to start an automated metadata extraction using AI based on the files you already
uploaded in the form.
(4) Create/cancel buttons
These buttons allow you to submit or cancel the entity creation.
(5) Document preview
The document preview allows you to see the documents added next to the form. This can be practical when you need
to read data from the document to fill in the form. The extract feature will also overlay information in the preview
when used.
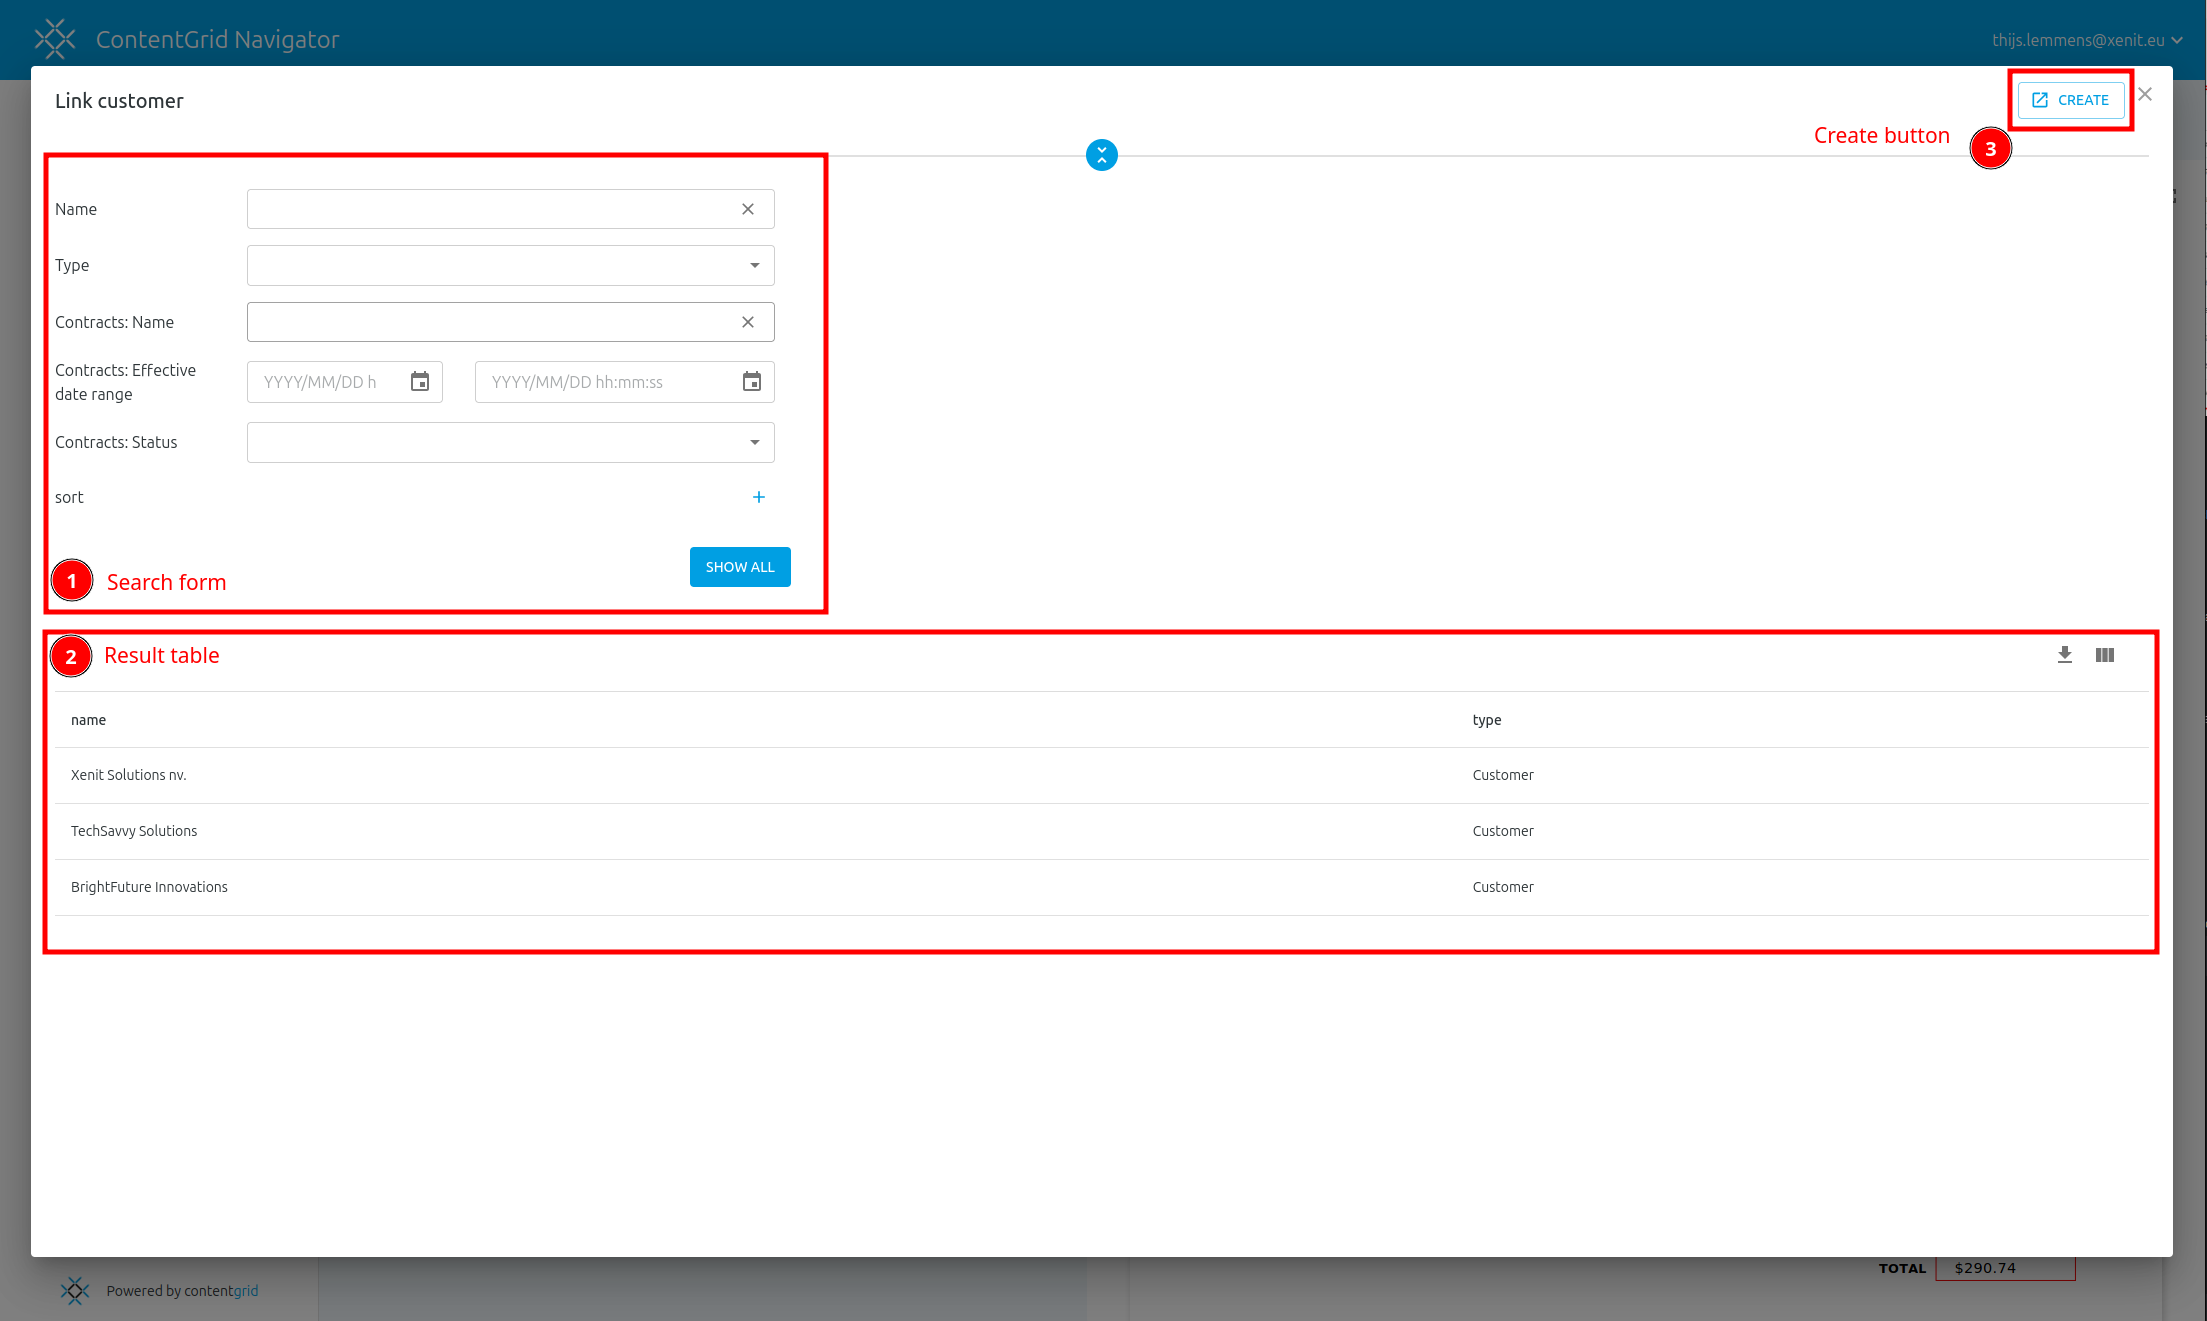
Link relation
After clicking the link data button in the create form a popover will appear that will help you link related entities.
(1) Search form
The search form in this popover functions similarly to the entity search form and searches
on the linked entity.
(2) Result table
After pressing the “SEARCH” or “SHOW ALL” button, the results table shows the candidates for linking. Just click a line
to link the entity. It is possible to link multiple entities if it is a “TO MANY” relationship.
(3) Create button
This button will open a new tab on the create form of the entity type you are trying to link. Use this when the entity
you want to link does not yet exist.
Application REST API
ContentGrid Applications expose a REST API that can be used to programmatically access the metadata and content stored in your ContententGrid application.
The API documentation gives examples using curl, but various tools or libraries can be used for making calls to the API.
An access token is required to access a ContentGrid Application.
Access tokens are always obtained through OpenID Connect (OIDC). The authentication token contains user identity information and the IAM attributes assigned to the user.
OIDC clients
To identify the application that performs the authentication, an OIDC client needs to be registered in the Organization’s IAM Realm.
An Organization can have multiple IAM Realms; ensure you are using the same Realm as the one used by the Application.
An OIDC client can be configured in the “Clients” tab of the IAM Realm.
Setting up an OIDC connection requires 3 configuration parameters that can be obtained from the OIDC client page:
Issuer URI
Client ID
Client Secret
OIDC configuration can be discovered from the Issuer URI using OIDC Discovery.
If OIDC discovery is not supported by your software, you can obtain the authorization and token endpoints manually from the discovery document, but this is not recommended.
Service account authentication
When using service account authentication, the access token is issued with its own privileges instead of with the privileges of a user.
By default, no IAM attributes are assigned to a service account. These need to be set up if the applicable permission policies require it to provide access.
When using user authentication, the access token is issued with the privileges of the user.
To use user authentication, you need to use the Authorization code grant.
This flow will necessary include a pass through the user’s web browser as part of the flow to obtain an access token.
ContentGrid applications expose a REST API using JSON as a response format.
All JSON responses use HAL as a hypertext format, linking to related resources.
Actions that can be taken on resources are specified using the HAL-FORMS format.
This documentation covers the basics of using the Application REST API, advanced usage with HAL is described in HAL Usage.
Because the specific API is generated from the configured data model, the examples will use an example datamodel.
OpenAPI spec
An OpenAPI spec for your application’s datamodel is available from the ContentGrid Console. Every Release has its own associated OpenAPI spec, which you can view or download.
For deployed applications, a copy of the OpenAPI spec is also available on /openapi.yaml (after authentication).
Resource types
A ContentGrid application can be configured with kinds of entities that have attributes and relations.
A single instance of such an entity is generically referred to as an entity-item. Multiple entity-items of the same kind together form an entity-collection.
These two form the main resource types in a ContentGrid application.
To support these resource types, a couple of additional resource types exist. Their relation to the main resource types is explained in the Resource Types reference.
Basic operations
This section explains all the basic operations (create, read, update, delete) for the resource types.
The operations are explained in their minimal form, without any request modifiers applied.
Tip
You can follow along with the examples by creating an application with the Example datamodel set up.
Define the following variables to make the examples easily runnable.
REGION="<Region where the application is deployed>"APP_ID="<ID of the application>"REALM="<Internal reference of your IAM Realm>"CLIENT_ID="<IAM Service account Client ID>"CLIENT_SECRET="<IAM Service account Client Secret>"
You will need to obtain an access token. This can be done easily with an IAM service account, which can be created in the console.
The Authentication documentation contains more details on this.
An entity-item resource is exposed on the path /<entity-name-plural>/{id} (e.g. /invoices/{id} for the invoice entity type).
{id} is a placeholder for the actual ID of the entity-item.
The following operations are available:
Method
Content-Type
Description
GET
application/hal+json
Read the entity-item with the specified id
PUT
application/json
Replace the entity-item data with the data supplied in the request body
PATCH
application/json
Update the entity-item data, modifying only the fields supplied in the request body
DELETE
N/A
Remove the entity-item
Note
The difference between PUT and PATCH is how attributes that are not present in the request body are handled:
PUT: It is written to the entity-item as null, removing the stored value.
PATCH: It is skipped, the stored value is unchanged.
This rule also applies to attributes of type content. Omitting the field will remove the content.
Update entity-item using PUT/PATCH
To show the difference between updating an entity-item with PUT or PATCH, we first show the existing state
An entity-collection has 3 query parameters that control the collection itself:
Query Parameter
Type
Description
_size
integer, 1-1000 or absent
Page size, the number of entity-item resources that will be returned on a single page
_cursor
string or absent
Cursor for the page to retrieve. Absent to retrieve the first page
_sort
string or absent
Sort the collection by an attribute. Parameter can be repeated multiple times to sort on multiple attributes
Pagination
By default, every page contains 20 entity-items. This can be changed with the _size query parameter.
When there are multiple pages, the meta information will contain prev_cursor and/or next_cursor fields.
A previous or next page can be retrieved by setting the _cursor query parameter to the value in the prev_cursor or next_cursor field.
Note
A cursor is not a fancy page number.
Cursors are opaque. A client should not parse or attempt to modify a cursor; they are only meaningful to the server.
Cursors are unique for every entity-collection. They can not be reused in a different context or used with different filter parameters.
Cursors are ephemeral. They should not be stored permanently to use at a later point in time, and they do not permanently identify a certain page
GET /invoices?_sort=received,asc&_sort=total_amount,desc HTTP/1.1Authorization:Bearer $TOKEN
Filtering
Search filters can be applied to the entity-collection. By default no filters are applied.
All filters are application-specific, and are mapped directly to query parameters. The OpenAPI spec lists all the valid filters as query parameters.
Note
Using a query parameter that is not a known search filter or one of the special query parameters will be ignored and have no effect.
Multiple search filters can be combined.
Different search filters are AND’ed together; repeating the same search filter multiple times will perform an OR on the different values of that filter.
Example of collection filtering with multiple search filters
GET /invoices?total_amount=15.95&total_amount=123.4&pay_before=2024-08-14 HTTP/1.1Authorization:Bearer $TOKEN
relation operations
An entity can have relations to a different entity. These are exposed on the path /<entity-name-plural>/{id}/<relation-name>. (e.g. /invoices/{id}/supplier for the invoice entity type and a relation supplier)
Depending on the relation type, the available operations and responses are different.
to-one relation operations
These operations are applicable to one-to-one and many-to-one relations.
Method
Content-Type
Description
GET
N/A
Read the relation link. Redirects to the entity-item that the relation refers to
PUT /invoices/$INVOICE_ID/supplier HTTP/1.1Authorization:Bearer $TOKENContent-Type:text/uri-listhttps://$APP_ID.$REGION.contentgrid.cloud/suppliers/$SUPPLIER_ID
HTTP/1.1204No Content
Reading the relation afterwards will result in a redirect to the specific item that was linked.
POST /suppliers/$SUPPLIER_ID/invoices HTTP/1.1Authorization:Bearer $TOKENContent-Type:text/uri-listhttps://$APP_ID.$REGION.contentgrid.cloud/invoices/$INVOICE_ID
https://$APP_ID.$REGION.contentgrid.cloud/invoices/$INVOICE2_ID
HTTP/1.1204No Content
Reading the relation will result in a redirect to a collection containing all items that are linked.
Note that the query parameter used in the redirect is subject to change and is not part of the public API.
A to-many relation also has a way to reference an individual item inside the relation; the relation-item resource.
These are exposed on the path /<entity-name-plural>/{id}/<relation-name>/{itemId} (e.g. /suppliers/{id}/invoices/{itemId} for the supplier entity type and a relation invoices).
Method
Description
GET
Read the relation collection item. Redirects to the entity-item if it is part of the relation collection
DELETE
Remove the relation collection item from the relation collection. No entity-items are deleted, only the link between the two is severed
Removing an item from a to-many relation
This will remove a single entity-item from the relation
An entity-content resource is exposed on the path /<entity-name-plural>/{id}/<attribute-name> (e.g. /invoices/{id}/document for the invoice entity type and a content attribute document). {id} is a placeholder for the actual ID of the entity-item.
The following operations are available:
Method
Content-Type
Description
GET
any
Retrieve stored file. If no file is currently stored, responds with HTTP 404 Not Found
PUT
any
Overwrite file with contents of request body
PUT
multipart/form-data
Overwrite file with contents of the file form-field
DELETE
N/A
Remove stored file
For the GET and PUT with arbitrary Content-Type; the filename is provided in the Content-Disposition header.
If no filename is provided during content upload, the filename field of the content attribute will be set to null
PUT /invoices/$INVOICE_ID/document HTTP/1.1Authorization:Bearer $TOKENContent-Disposition:attachment;filename="example-invoice.pdf"Content-Type:application/pdf....Omitted contents of file example-invoice.pdf....
HTTP/1.1204No Content
Overwrite content of an invoice using multipart upload
PUT /invoices/$INVOICE_ID/document HTTP/1.1Authorization:Bearer $TOKENContent-Type:multipart/form-data;boundary="delimiter123"--delimiter123
Content-Disposition: form-data; name="file"; filename="example-invoice.pdf"
....Omitted contents of file example-invoice.pdf....
--delimiter123--
HTTP/1.1204No Content
Request modifiers
The basic operations explained above can be extended with additional functionality.
Additional functionality is layered on top of the basic operations using HTTP headers.
Conditional requests
Conditional requests allow to check a precondition before applying the request to the target resource.
They are an implementation of RFC9110 Conditional Requests.
The primary usage of conditional requests is to prevent the “lost update” problem, where one system overwrites the changes of another system that made a write between the read and write of the first system.
Comparing without/with conditional requests
Without conditional request
With conditional request
sequenceDiagram
    autonumber
    participant a as System A
    participant s as ContentGrid API
    participant b as System B

    a ->>+ s: GET item
    s -->>- a: 200 OK<br>ETag: "abc"<br>original data

    b ->>+ s: PUT item<br>new data
    s -->>- b: 204 No Content<br>ETag: "def"

    a ->>+ s: PUT item<br>other data
    s -->>- a: 204 No Content<br>ETag: "mno"
    note over a, s: "new data" was accidentally<br>overwritten by "other data"<br>without System A having seen it
sequenceDiagram
    autonumber
    participant a as System A
    participant s as ContentGrid API
    participant b as System B

    a ->>+ s: GET item
    s -->>- a: 200 OK<br>ETag: "abc"<br>original data

    b ->>+ s: PUT item<br>new data
    s -->>- b: 204 No Content<br>ETag: "def"

    a ->>+ s: PUT item<br>If-Match: "abc"<br>other data
    rect red
    s -->>- a: 419 Precondition Failed
    note over a, s : request was rejected<br>System A did not accidentally<br>overwrite the "new data"
    end
Conditional requests can be used on the resources that have an ETag response header, which are these:
Name
URL
entity-item
/<entity-name-plural>/{id}
to-one relation
/<entity-name-plural>/{id}/<relation-name>
entity-content
/<entity-name-plural>/{id}/<attribute-name>
To perform conditional requests, a previously obtained ETag value has to be placed in the If-Match or If-None-Match headers. Note that the quotes are part of the ETag value.
The If-Modified-Since and If-Unmodified-Since headers are not supported, because no Last-Modified response header is present, and they are less precise.
Using a conditional request for updating
In this example, we’re going to move the pay_before date one day earlier.
curl -i -X GET https://$APP_ID.$REGION.contentgrid.cloud/invoices/$INVOICE_ID   \
    -H "Authorization: Bearer $TOKEN"
GET /invoices/$INVOICE_ID HTTP/1.1Authorization:Bearer $TOKEN
After retrieving the invoice response, we take note of the ETag header, and place if in the If-Match header for our next request.
Then we perform a PATCH request to update only the pay_before attribute.
Between our requests…
To execute this example, you will need to change the If-Match header to the correct value yourself.
HTTP/1.1412Precondition FailedContent-Type:application/problem+json{
"type": "https://contentgrid.cloud/problems/unsatisfied-version",
"title": "Object has changed",
"detail": "Requested version constraint 'is any of [exactly '1e0k4j9']' can not be satisfied (actual version exactly '1r061qt')",
"status": 412,
"actual_version": "1r061qt"}
Range requests allow retrieving a partial representation of the entity-content resource. They are an implementation of RFC9110 Range Requests.
Range requests are only supported on the entity-content resource (/<entity-name-plural>/{id}/<attribute-name>), as indicated by the Accept-Ranges header.
You usually don’t use range requests directly, but some tools that work with potentially large files (like PDF viewers or download managers) can make use of them.
Warning
When composing a file together from multiple parts, it is critical to check that the ETags of all parts are identical.
Otherwise, a concurrent change of the content will result in the composed file being corrupted.
Using a range request to retrieve a part of a resource
In this example, the first 4 bytes are fetched separately.
ContentGrid applications expose a REST API using JSON as a response format.
All JSON responses use HAL as a hypertext format, linking to related resources.
Actions that can be taken on resources are specified using the HAL-FORMS format.
Links connect resources together. Instead of constructing URLs yourself, you use the provided link to go to the related resource.
Link Relation Types
Links express a relation between the resource they appear on (the link context), and the link target.
The link relation type (RFC8288 Sec 3.3) determines the kind of relation between the link context and the link target.
CURIEs (Compact URIs) are a shorthand notation for extension link relation types.
They are used as defined in the HAL specification. Before comparing a link relation, a CURIE must be expanded into the full URI.
Instead of linking to a related resource, it is also possible to directly embed it in the main resource.
This is of only possible when the resource to be embedded is also a HAL resource.
In the ContentGrid application, this is mostly used for the entity-collection resource, where the page is the main resource,
and all items on the page are embedded resources.
Link Relation Types work the same for embedded resources as they do for links.
An embedded resource should have a self link.
The link attributes on the self-link of the embedded resource can be considered as
the link attributes that would be present on a normal link to the embedded resource.
Where HAL links describe related resources, HAL-FORMS templates describe the operations available on the resource.
HAL-FORMS are described in their own specification. ContentGrid adds additional functionality to the base specification, described in HAL-FORMS extensions.
The keys in _templates tell you what forms are available.
Search within the collection of the type described by the profile
HAL-FORMS Extensions
ContentGrid extends the HAL-FORMS specification with support for nested JSON objects, additional body encodings (multipart/form-data and text/uri-list), and extended options element behavior.
The entity-collection resource provides HAL links that can be used pagination.
Pagination uses the standard IANA-registered link relation types for their purpose:
first: First page of results (may be absent if you’re already on the first page)
prev: Previous page of results (absent when on the first page)
next: Next page of results (absent when on the last page)
self: Current page
To navigate through pages, follow the next link until it’s absent. The cursors in these links are opaque values managed by the server - don’t try to parse or construct them yourself.
Discovering the API Structure
Start at the entities-root resource to discover the entire API.
The root resource contains cg:entity links to all entity collections in your data model. Use these to discover what entities are available without hardcoding entity names.
Alternatively, follow the profile link to arrive at the profile-root, and follow the cg:entity links there to arrive at the entity-profiles for every entity in your data model.
Using Entity Profiles
Entity profiles provide machine-readable metadata about entity types in a ContentGrid application.
They describe the attributes, relations, constraints, and available operations for each entity type.
The entity-profile supports content negotiation between two formats:
The HAL-FORMS profile format is the richest representation. It describes the full model of an entity type, its attributes and relations, and provides search and create-form templates.
The ContentGrid REST API uses the standard HTTP status codes to signal errors.
RFC9457 Problem Details are used to provide additional information about the error condition.
HTTP Status Codes
The ContentGrid Application API uses standard HTTP status codes to indicate the success or failure of API requests.
These status codes provide high-level information about what happened with your request, and are generically described in RFC9110.
Successful Responses (2xx)
200 OK: The request succeeded. The response body contains the requested resource or data.
201 Created: A new resource was successfully created. The Location header contains the URL of the newly created resource.
204 No Content: The request succeeded but there is no response body. This is typically returned after successful updates or deletions.
Redirection Responses (3xx)
302 Found: The resource is temporarily available at a different URI. The Location header contains the URI where the resource can be found. This is commonly used when accessing relations.
Client Error Responses (4xx)
400 Bad Request: The request is malformed or contains invalid data. The response body may contain a problem detail explaining what went wrong if the request is sufficiently syntactically valid to be able to be processed.
401 Unauthorized: The request lacks valid authentication credentials.
403 Forbidden: The server understood the request but refuses to authorize it. This occurs when you don’t have permission to perform the requested operation.
404 Not Found: The requested resource does not exist. This could be an entity that doesn’t exist, an empty relation, or an unknown endpoint.
409 Conflict: The request conflicts with the current state of the resource. This occurs with unique constraint violations or when trying to delete an entity that is still referenced by required relations.
412 Precondition Failed: The condition specified in the request headers (If-Match or If-None-Match) was not met. This typically occurs when using optimistic locking and the entity has been modified by another request.
415 Unsupported Media Type: The Content-Type header specifies a media type that the server doesn’t support for this endpoint.
Server Error Responses (5xx)
500 Internal Server Error: An unexpected error occurred on the server. Contact support if this persists.
Problem Details (RFC 9457)
When an error occurs (4xx or 5xx status codes), the API returns a standardized error response using the RFC9457 Problem Details format. This provides a consistent, machine-readable way to communicate error information.
Problem Detail Structure
All error responses have Content-Type: application/problem+json and include these standard fields:
type (string): A URI identifying the problem type (e.g., https://contentgrid.cloud/problems/not-found/entity-item)
title (string): A short, human-readable summary of the problem type
detail (string): A human-readable explanation specific to this occurrence of the problem
status (number): The HTTP status code for this problem
Additional properties: Problem-specific fields that provide more context
HTTP/1.1412Precondition FailedContent-Type:application/problem+json{
"type": "https://contentgrid.cloud/problems/unsatisfied-version",
"title": "Object has changed",
"detail": "Requested version constraint 'is any of [exactly 'outdated-version']' can not be satisfied (actual version exactly '1r061qt')",
"status": 412,
"actual_version": "1r061qt"}
Problem Types Reference
For a complete catalog of all problem types returned by the ContentGrid API, see the Problem Types reference.