Concepts
Console
The ContentGrid Console is a management interface for the ContentGrid platform. It provides a web-based user interface to manage your ContentGrid Projects, Applications and more.
The Console is available at https://console.contentgrid.com
Organizations
An Organization is a top-level concept. Every operation within ContentGrid, happens in the context of an Organization.
ContentGrid Organizations are used to:
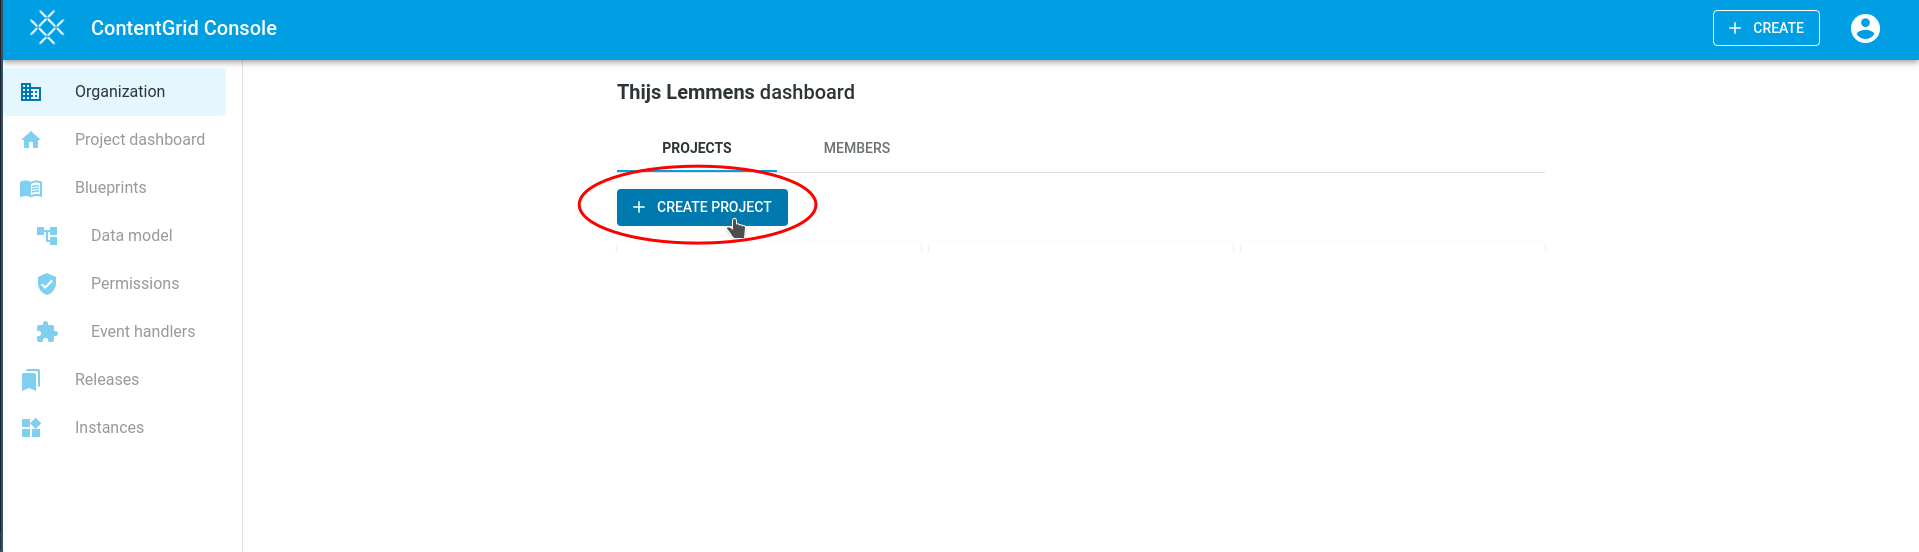
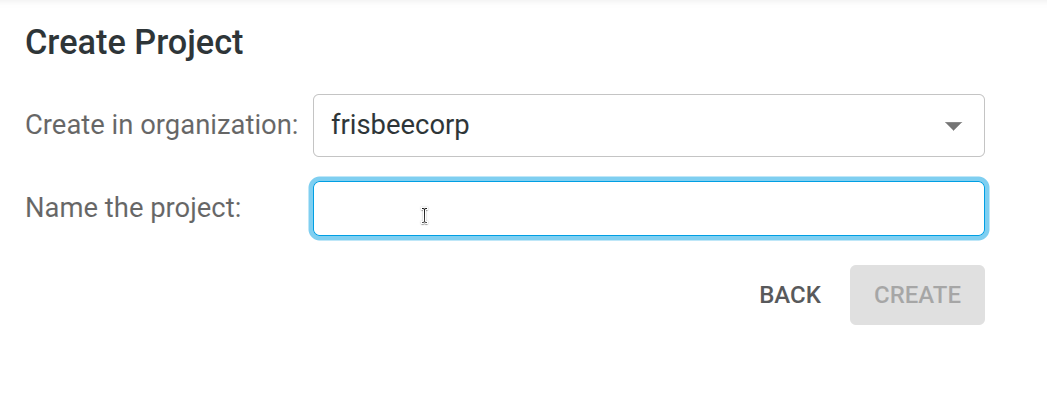
Projects
A Project belongs to an Organization and contains:
Your Users will use the deployed Applications.
Members
Members are project administrators for an Organization. They can create new Projects, collaborate on Blueprints, manage Applications and IAM Realms
Note that members are not Users. A User does not need to be a member of your Organization to access an Application.
At this time, members cannot be assigned different roles or permissions. Every member is effectively an organization and project administrator.
Blueprint
A blueprint is the design area of a Project. It describes the full model of an application, including the Data Model, Permissions and any Automations. This model determines how the data is stored in the database, how the REST API is structured and how automations are integrated.
A Release can be created from a Blueprint.
Creating a new version of an active application means making changes in the Blueprint and creating a new Release before deploying this release to a running Application.
A Project has a Blueprint called main.
A Blueprint does not contain any application- or user-data.
TIP: If you are wondering where application- & user-data is stored, see: storing-data.
Release
A Release is an immutable snapshot of a Blueprint and is the artifact that can be deployed to an Application.
A Release is created from the current Blueprint. It has a release-label, like v1.2.3 and optionally a short description. A Release follows a chronological previous Release and belongs to a single Project.
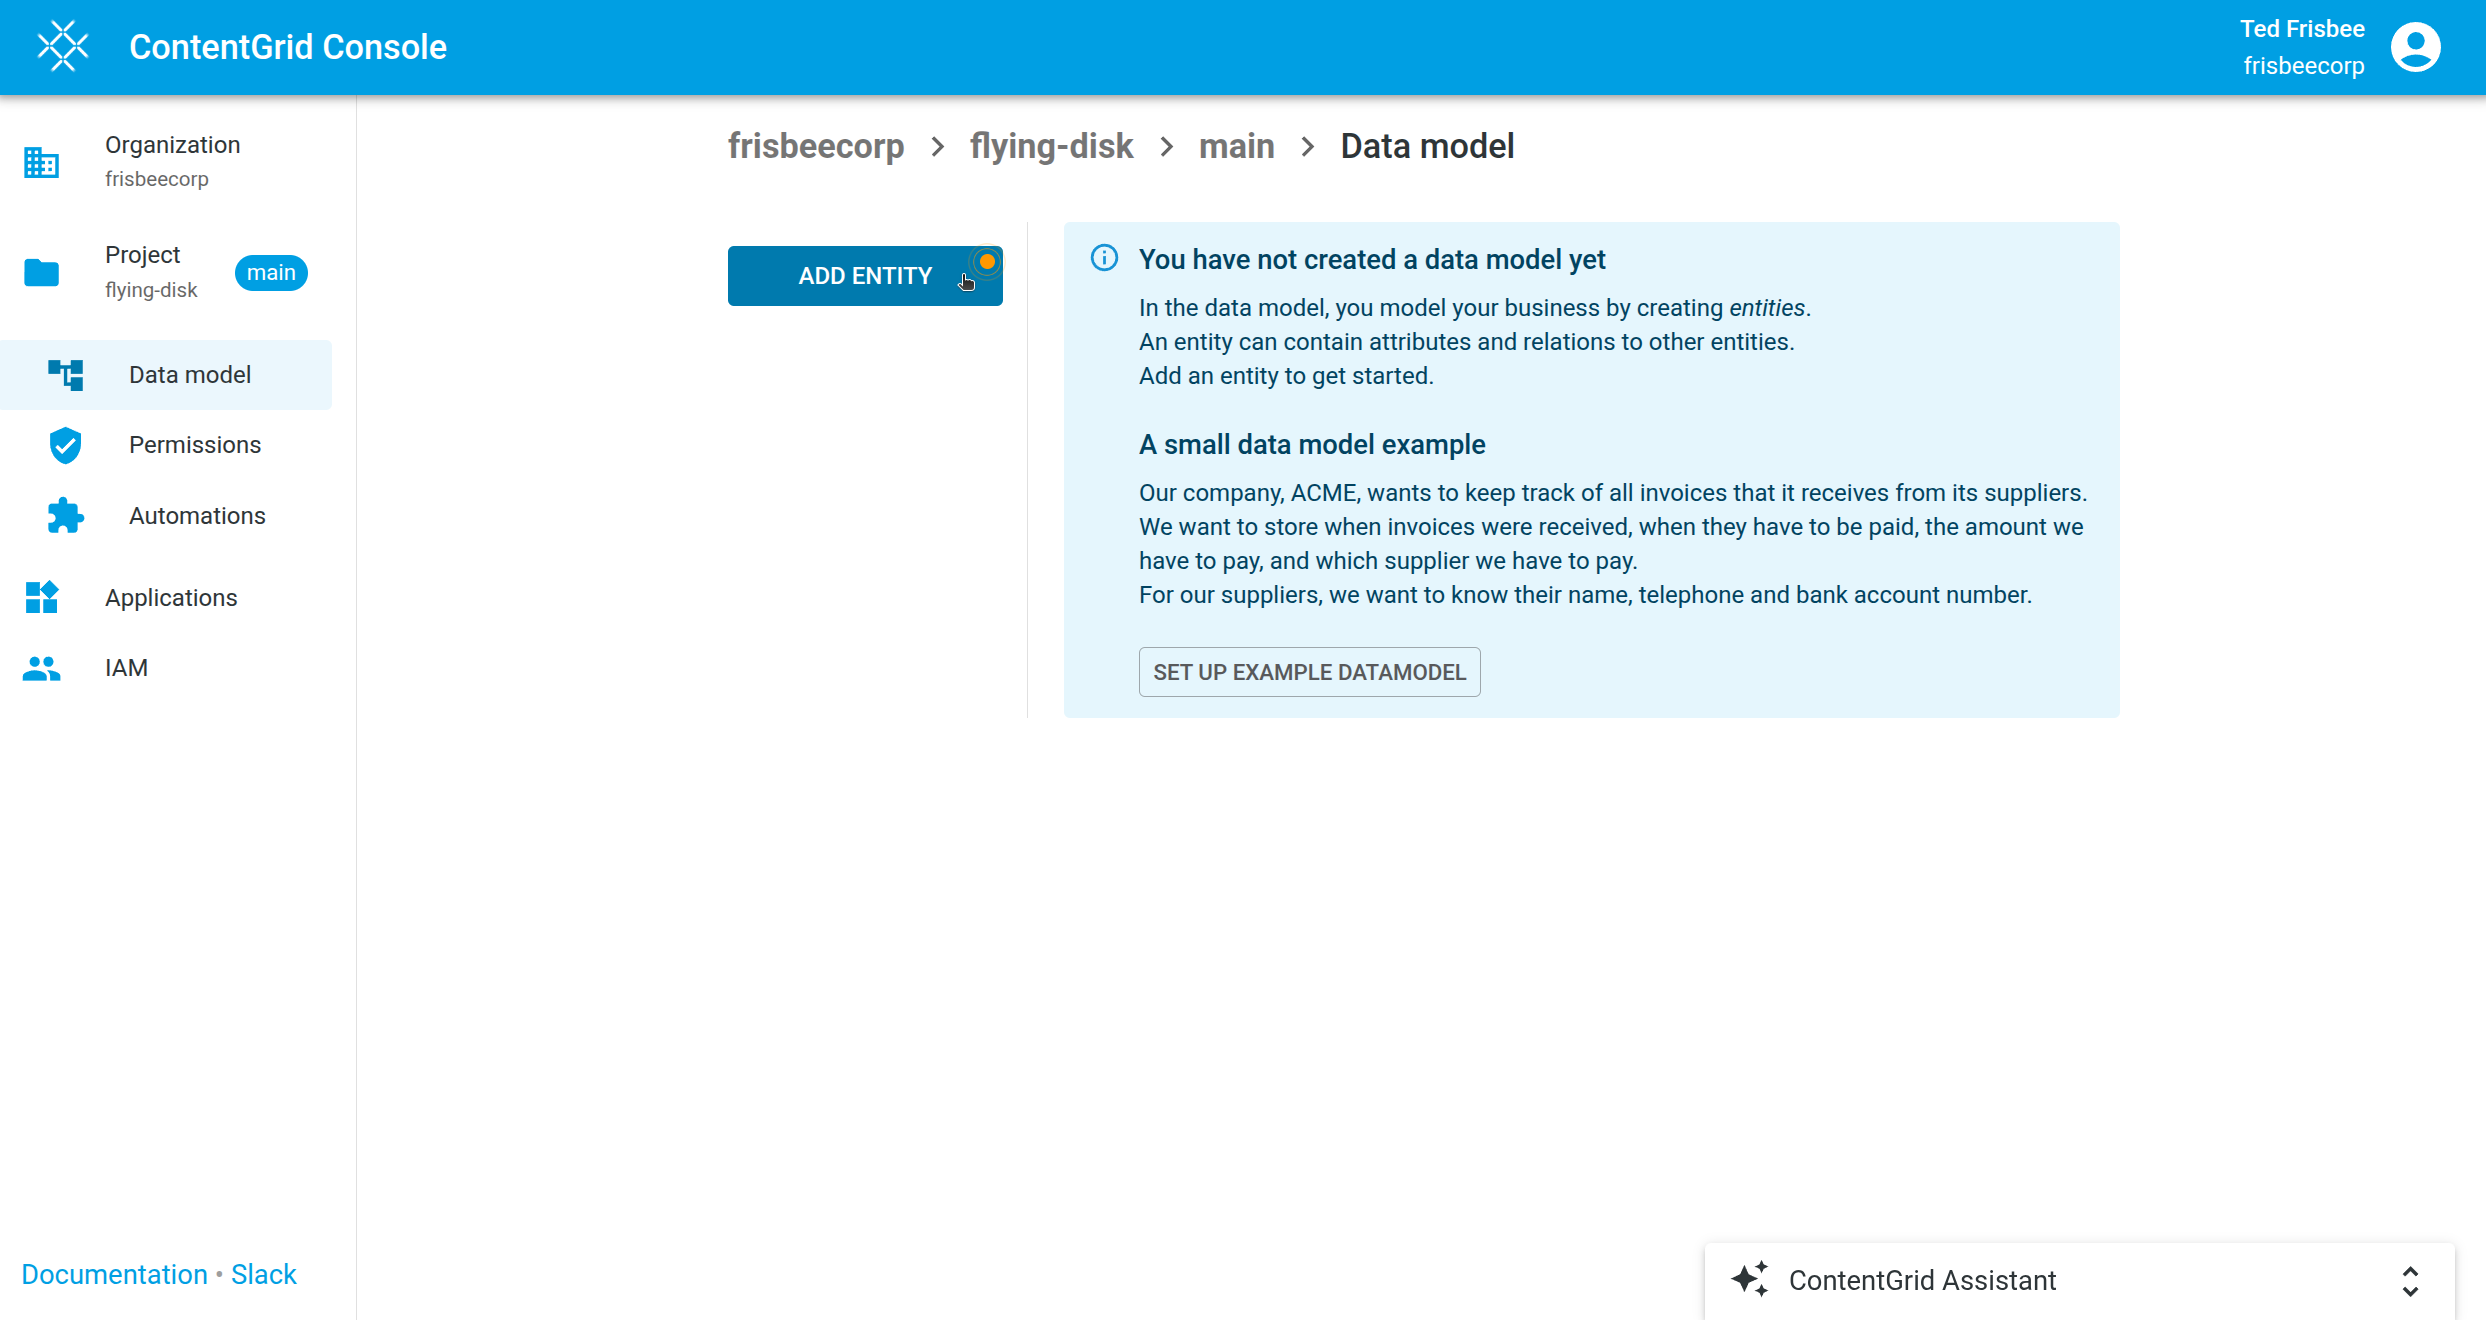
Data Model
The data model is a logical abstraction of concepts from the real world. The data model contains Entities with Attributes and Relations between Entities.
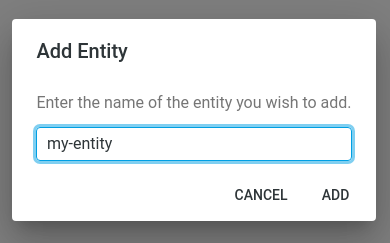
Entities
An Entity represents an object or concept in the digital world. It can represent a physical object, like a product or an invoice-document, or a virtual concept, like an online order.
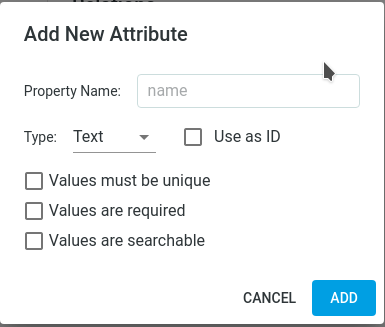
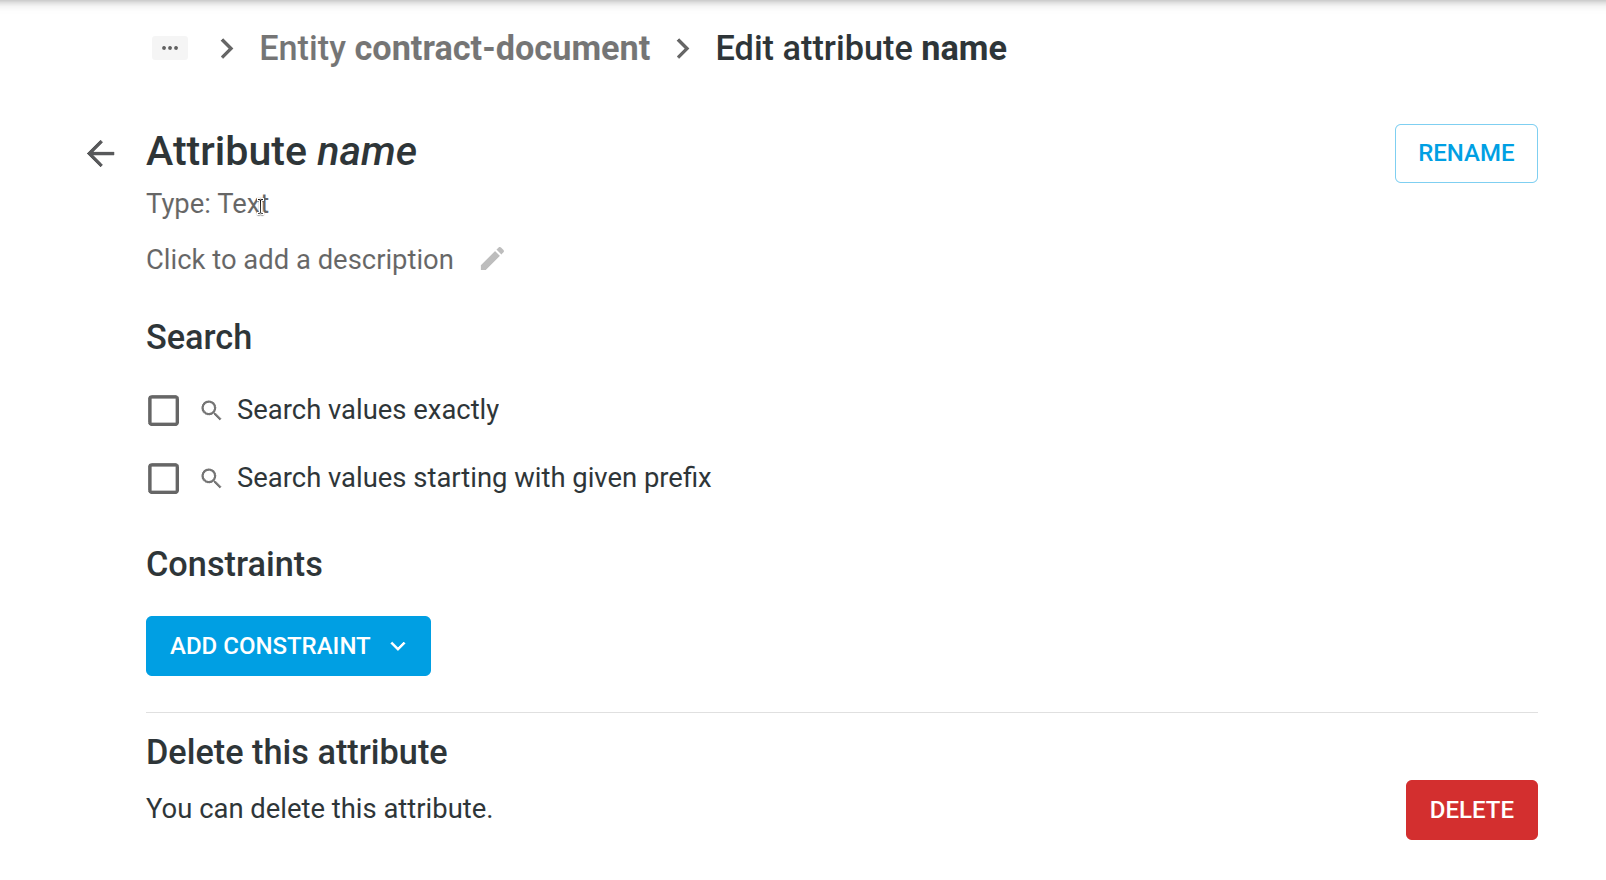
Attributes
An attribute is a single characteristic of an Entity. An attribute has a data type, such as text, number or date. A file is stored as a special attribute type called content. For example, the attributes for an invoice could be number, amount and document.
Relations
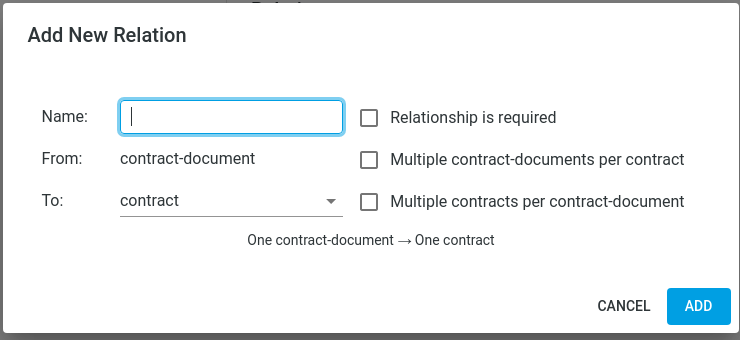
A relation is a named link between two Entities in the Data Model.
Entities can have a one-to-one, one-to-many, many-to-many or many-to-one relationship with another entity. For example, an invoice has a many-to-one relationship with the customer entity: many invoices can have a reference to the same customer.
A relation can be optional or required.
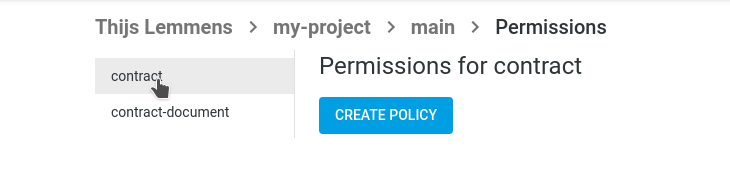
Permissions
Permissions govern under what conditions Entities are visible for a principal (a User or Service Account). They are made up of a collection of Policies per Entity.
ContentGrid uses an Attribute Based Access Control (ABAC) system. This means that a set of rules define access, using attributes of the principal issuing a request and attributes of the Entities being acted upon.
Permissions are deny-by-default.
Policies
Policies are a set of rules, that specify a the conditions under which Operations are allowed on an Entity. A policy always applies to a single Entity.
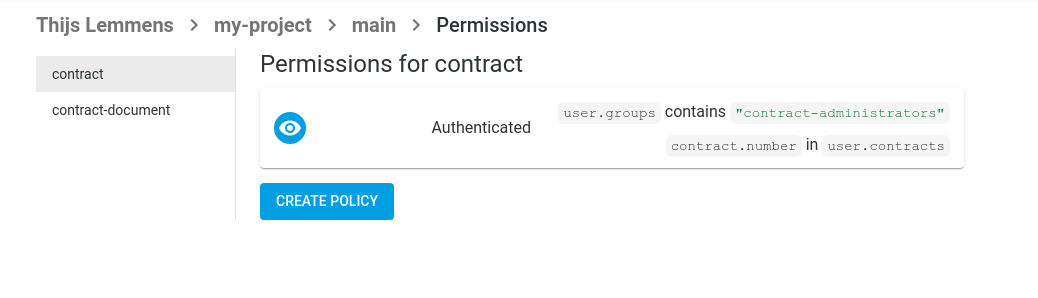
Under normal circumstances, every Entity gets a Policy. In the absence of any Policies for an Entity, all Operations on this Entity are disallowed for everyone.
One Entity can have multiple Policies, that are inclusively disjunctive. In other words, the policies are combined with “OR” logic: a request is allowed if the conditions of Policy A OR Policy B are satisfied.
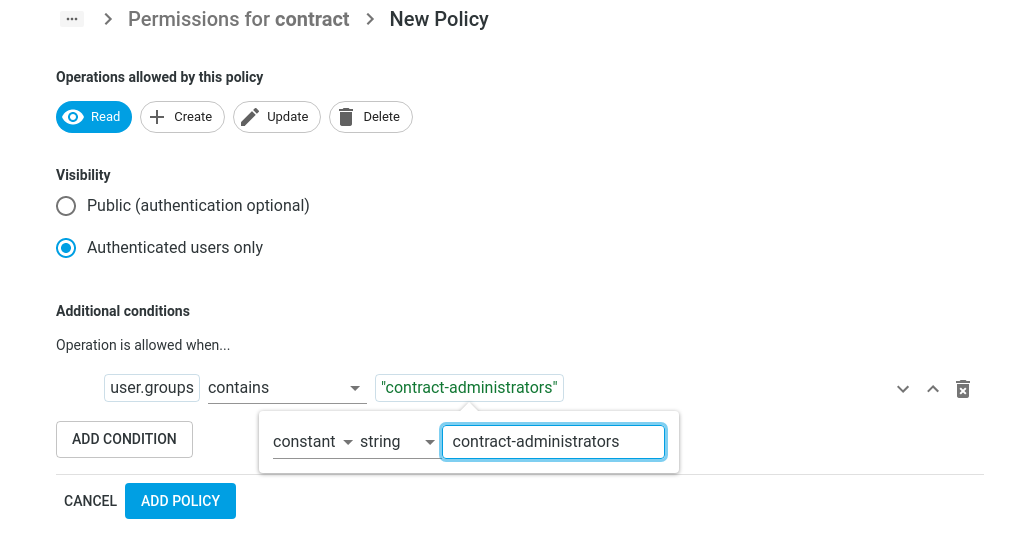
Operations
Operations are actions that a principal (a User or Service Account) can perform on an Entity.
The available actions are Read, Create, Update, Delete. A policy can cover one or more operations.
Policy Conditions
Policy Conditions specify additional requirements that must be met, before an operation is allowed. They are like extra security checks that ensure that only the right people can access your Entities or perform actions on them. For a policy to allow something, all conditions in that policy must pass.
A policy without conditions allows the selected operations for all logged-in users.
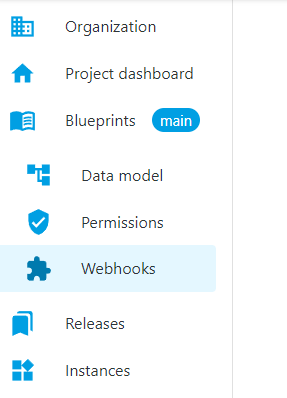
Automations
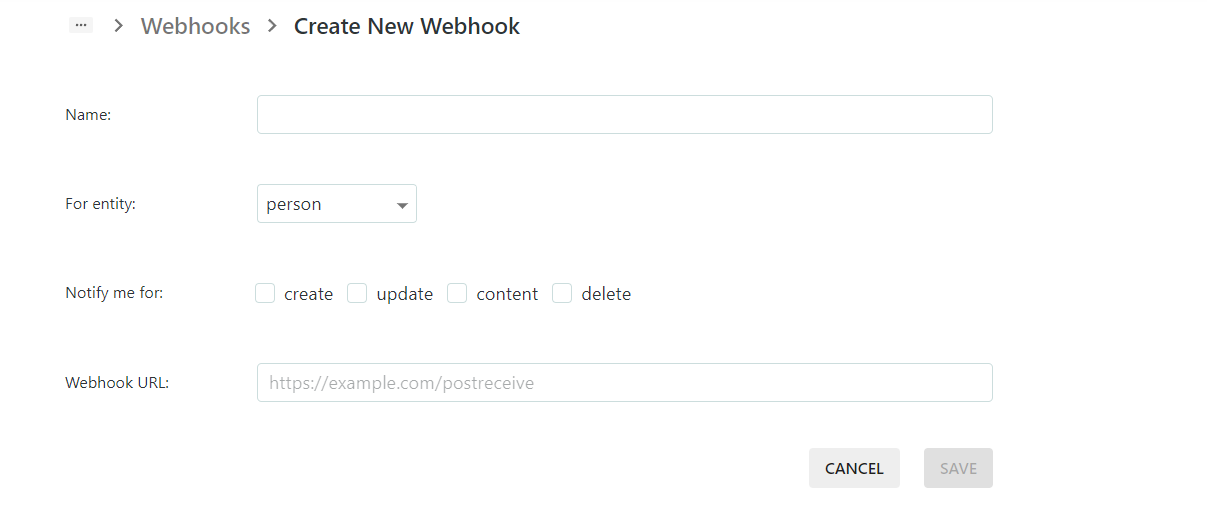
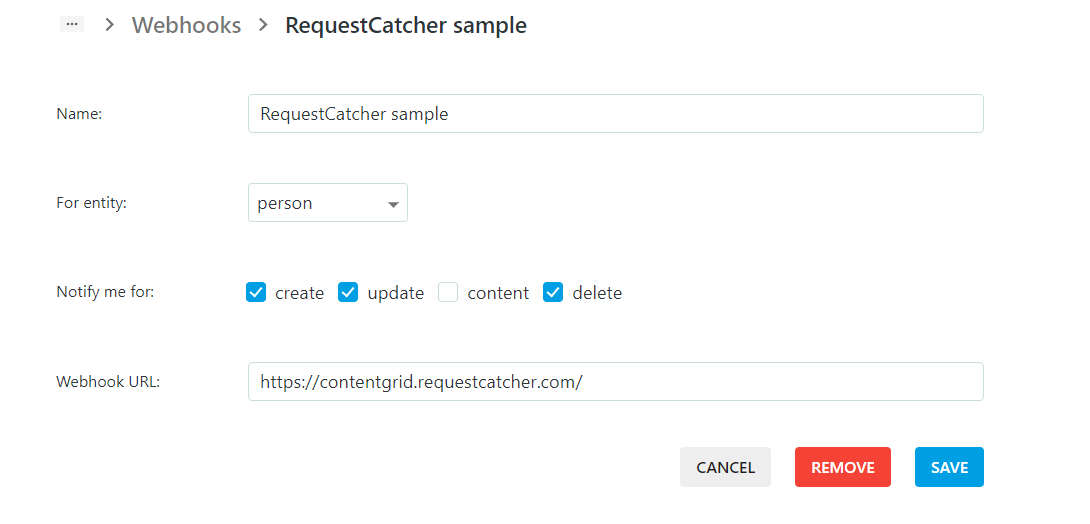
Webhooks
Webhooks provide a way to configure a ContentGrid Application to send notifications to external systems whenever certain changes occur.
When a mutating operation is performed (for example, a user created a document), an HTTP request is sent to the configured endpoint, with a payload describing the change. Every operation is handled individually and asynchronously. Delivery of webhook events are usually in chronological order, but in-order delivery is not guaranteed.
A webhook receiver needs Service Account credentials, if it wants to call the REST API of the Application.
Applications
Applications are running instances of a Project. An Application is created in a Zone. After creating the Application, a Releases can be Deployed to an Application.
A Project can have multiple active Applications, possibly representing different environments or to try out different Releases.
Each Application is linked to one IAM Realm. The first time an Application is created in a Zone, a default IAM Realm is created for the Organization in this Zone.
Zones
A Zone is the deployment target of an Application and maps to the geographical location of a cloud provider that runs ContentGrid Applications.
An Organization creates an Application in a given Zone.
Currently there is one zone available: Scaleway Paris
Deployments
A Deployment is the rollout of a specific Release to an Application.
Once a Release is deployed, the Application provides a REST API to store, retrieve and manipulate data.
IAM
IAM (Identity and Access Management) is the system that manages User-accounts for ContentGrid Applications.
Realms
A Realm or IAM Realm contains a collection of Users, Groups and their attributes. Applications are linked to an IAM Realm to authenticate Users and Service Accounts.
Multiple Applications, across Projects but within the same Organization, can be connected to the same IAM Realm.
When an Application is created in a Zone for the first time, an IAM Realm gets automatically provisioned.
Users
IAM Users are human principals that interact with Applications.
Users are identified by their email address. Users can be a assigned to one or more Groups. Groups can have attributes and are recommended way to organization Permissions.
NOTE: an Organization Member is not automatically a User of an Application.
Groups
IAM Groups allow you to organize Users based on shared characteristics.
Groups have a collection of user memberships and a set of Attributes. For the purpose of permission evaluation, users inherit attributes from the groups they are a member of. For example, you might create a group for all users in the accounting department, so you set the group’s department-name attribute to “accounting”, so that you can create a permission policy for invoices that checks what department a user belongs to.
These attributes are defined in the IAM Attribute Model.
Attribute Model
The IAM Attributes describe a set of properties for Groups. The purpose of this model is to describe the information that can be used in permissions. Users inherit properties from the groups they are member of.
It is similar to defining Attributes for an Entity in the Datamodel, but is not part of a Blueprint.
Service Accounts
A Service Account is a non-human principal in an IAM Realm. A Service Account can acquire an access token, to interact with the REST API of an Application.
Service Accounts are useful for programmatic integrations with the REST API. For example, a Webhook receiver may call back into the REST API to update a status field, but it needs to be authenticated to do so.
Subsections of Architecture
System Overview
ContentGrid is a model- and API-first Enterprise Content Management (ECM) platform that generates complete,
standards-based REST APIs directly from your data model. The platform consists of two primary environments: a Management
Platform for application configuration and a Runtime Platform for execution.
What Makes ContentGrid Different
Traditional ECM systems often rely on folder hierarchies, generic database schemas, and monolithic architectures.
ContentGrid takes a fundamentally different approach:
Model-First Design: Define your data model with entities, attributes, and relations. ContentGrid automatically
generates intuitive REST APIs that mirror your domain model—URLs like /invoices and /invoices/{id} emerge naturally
from your schema.
Relational Database Foundation: Unlike ECMs that use generic key-value storage, ContentGrid leverages PostgreSQL’s
full capabilities by mapping entities directly to tables and columns. This enables efficient queries, proper indexes,
and standard database tooling.
Attribute-Based Access Control: Instead of folder-based permissions, ContentGrid uses ABAC policies that evaluate
entity and user attributes. This provides flexible, fine-grained access control independent of data organization.
Small Core, Extensible Ecosystem: The platform core provides only essential ECM functionality. Everything else is
implemented as external automations that integrate seamlessly through standard protocols.
Architecture at a Glance
graph TB

    subgraph "Runtime Platform"
        Gateway[Gateway<br/>Routing & Authorization]
        Keycloak[Keycloak<br/>Authentication]
        OPA[OPA<br/>Policy Evaluation]
        Solon[Solon<br/>Policy Collection]
        Navigator[Navigator<br/>Web UI]
        RabbitMQ[(RabbitMQ<br/>Message Broker)]
        Slingshot[Slingshot<br/>Webhook Delivery]
        TokenMonger[TokenMonger<br/>Automation Auth]

        subgraph "Application Instance"
            AppServer[Application Server<br/>Dynamic API]
        end

        subgraph "Persistent Storage"
            DB[(PostgreSQL<br/>Metadata & Structure)]
            S3[(S3-Compatible<br/>Content Storage)]
        end
    end

    Gateway --> OPA
    Gateway --> AppServer
    Users -->|token exchange| TokenMonger
    AppServer --> Solon
    Solon --> OPA
    AppServer --> DB
    AppServer --> S3
    AppServer -->|events| RabbitMQ
    RabbitMQ --> Slingshot
    Users[Clients] --> Keycloak
    Users --> Gateway
    Users --> Navigator

    MP[Management Platform]
    MP -->|Configure| Gateway
    MP -->|Configure| AppServer
The Management Platform is where you define, configure, and deploy ContentGrid applications. It consists of three
primary components:
- Architect: Source of truth for application models (entities, permissions, configurations)
- Scribe: Transforms models into deployment artifacts (application model, database migrations, policies, OpenAPI specs)
- Captain: Orchestrates infrastructure provisioning and Kubernetes deployment
The platform runs as a SaaS service—you don’t need to host or manage it yourself. For complete details on how these
components work together to enable the full application lifecycle, see Management Platform.
The Runtime Platform provides the infrastructure and services to run ContentGrid applications securely and efficiently.
Key components include:
- Gateway: Entry point for all requests, handles routing, authentication, and policy evaluation
- Keycloak: Identity and access management via OpenID Connect
- OPA: Centralized policy engine for attribute-based access control
- Navigator: Shared React frontend that dynamically adapts to any application model
- Solon: Collects policies from all applications and bundles them for OPA.
- Pathfinder: Automatic Ingress management and TLS certificate provisioning
- RabbitMQ: Message broker for event-driven webhook delivery
- Slingshot: Delivers entity lifecycle events to external systems as signed webhooks
- TokenMonger: Token exchange service for secure automation authentication
All components run in Kubernetes and use dynamic service discovery to automatically detect and integrate new
applications. For complete details on platform architecture, request flow, and operational characteristics,
see Runtime Platform.
Application Server
Each ContentGrid application runs as an instance of the Application Server—a single shared container image configured
with application-specific artifacts. The server uses a configuration-driven approach rather than code generation,
enabling rapid deployment of model changes.
For complete details on architecture, query construction, and performance characteristics,
see Application Server.
Data Storage
ContentGrid separates structured metadata from binary content for optimal performance:
PostgreSQL: Each application has its own database with schema generated automatically from the data model. Entities
map to tables, attributes to columns, and relations to foreign keys. Flyway manages migrations.
S3-Compatible Storage: Binary content (documents, images, videos) is stored in dedicated S3 buckets per application.
Encryption: Transparent application side encryption at rest.
For complete details on encryption architecture, key management, and range request support,
see Data Storage.
Deployment Pipeline
The deployment pipeline automates the complete path from application model to running service:
- Artifact Generation: Scribe generates a versioned ZIP artifact with model, migrations, and policies
- Infrastructure Provisioning: Captain provisions database, S3 bucket, and Keycloak realm
- Kubernetes Deployment: Captain creates all necessary Kubernetes resources
- Application Startup: Application Server fetches artifact, runs migrations, and begins serving
For complete details on the deployment see Deployment Pipeline.
Integration Points
The platform provides several mechanisms for external automations to extend functionality:
- Service accounts: Automations authenticate via OIDC client credentials flow
- Webhook Notifications: Automations subscribe to create/update/delete events
External automations integrate seamlessly, they can use the same HAL/HAL-FORMS patterns as core functionality, making
them familiar to API consumers.
Key Architectural Benefits
Developer Experience: Standards-based APIs (HAL, HAL-FORMS, RFC 9110) reduce learning curves and enable existing
tooling. Model-first approach means intuitive URLs that match your domain.
Scalability: Each application is independently scalable. Kubernetes-native architecture enables horizontal scaling
of application instances. Database and storage scale independently.
Security: ABAC policies evaluated at query time prevent unauthorized data from being loaded. Content encryption
ensures data confidentiality. Separate isolation per application.
Flexibility: Small core with automation extension points allows customization without forking. Replace or disable
automations independently. Multiple implementations of the same functionality can coexist.
Operational Simplicity: Single shared container image for all applications. Configuration-driven rather than code
changes. Standard Kubernetes operations for deployment and scaling.
Next Steps
For deeper understanding of specific subsystems:
Architecture Principles
This document explains the design philosophy driving ContentGrid’s architecture and the principles that guide technical
decisions. Understanding these principles helps evaluate how the platform aligns with your requirements and technical
values.
Foundational Principles
API-First
The application exposes a REST API as the only interaction point—for both end-users and external automations. There is
no separate “admin API” or backend interface; everything flows through the same well-defined API.
The REST API uses the HAL response format. HAL’s
hypermedia links allow referencing related endpoints and discovering capabilities dynamically. At the same time, the
core data is available as plain JSON objects—developers who don’t need HAL’s hypermedia features can simply use the
standard JSON payload.
For a single application with a known model, the API structure is regular and predictable. HAL becomes essential when
building generic tools that need to work across multiple different models (e.g., different projects or organizations).
These generic consumers use HAL to adapt automatically to any data model.
Model-First
The API is generated directly from your relational content model. Entities with attributes and relations map naturally
to URLs you’d expect from a hand-crafted application. For example, an invoice entity generates /invoices and
/invoices/{id} endpoints automatically.
The data APIs don’t expose model abstractions like “entity,” “attribute,” or “relation” in their payload structure.
These concepts are internal implementation details. Your API consumers work with invoices, suppliers, and
documents—domain concepts, not meta-model concepts.
For developers building generic integrations, a separate model API (/profile and /profile/{entity}) does expose the
entity and attribute metadata. This information is static for a particular application version and enables automations
to adapt to any model without hardcoded entity knowledge.
Small Core
The application core provides only essential ECM functionality that cannot be implemented externally. Everything else is
pushed to external automations.
Why keep the core small?
-
Scalability: Core functionality is critical for the functioning of ContentGrid. Keeping it small makes it easier
to scale this part horizontally, making sure it can handle the requests with good response times.
-
Reduced Security Surface: Fewer features in the core mean fewer places where permission checks can be
misconfigured. A smaller codebase is easier to audit and secure.
-
Easier Maintenance: A well-defined, focused core is easier to understand, test, and maintain. The dynamic nature
of model-driven applications already introduces complexity—keeping the core small manages this complexity.
Extensibility
Extensions add capabilities beyond the core platform while remaining loosely coupled. They can be developed in-house, by
customers, or by third parties.
Extensions are not implicitly trusted. Token-based authentication ensures users and extensions have appropriate
access without exposing primary credentials. Extensions can act on behalf of users (delegated access) or under their
own identity (system access). When extensions act on behalf of users, they receive at most the user’s privileges—never
more.
This security model enables safe integration of third-party services while maintaining ContentGrid’s permission model.
Extensions access data through the same REST API as any other client, ensuring consistent authorization enforcement.
Summary
ContentGrid’s architecture principles prioritize developer experience, operational flexibility, and data security. By
keeping the core small and designing for extensibility, the platform enables rapid
development while maintaining long-term maintainability.
The model-first, API-first approach generates intuitive, standards-compliant REST APIs from your domain model. The clear
separation between core and automations provides flexibility without sacrificing integration quality.
The Management Platform is where you define, configure, and deploy ContentGrid applications. It runs as a SaaS
service—you don’t need to host or manage it yourself. This page explains its internal architecture and how it transforms
application models into deployable artifacts.
The Management Platform consists of three primary components that work together to enable the full application
lifecycle: from model definition through artifact generation to deployment orchestration.
graph TB
    subgraph "Management Platform"
        Architect[Architect<br/>Model Definition]
        Scribe[Scribe<br/>Artifact Generation]
        Captain[Captain<br/>Deployment Orchestration]
    end

    subgraph "Runtime Platform"
        K8sResources[Resources<br/>ConfigMaps, Secrets, Deployments]
    end

    subgraph "Persistent Storage"
        DB[(PostgreSQL<br/>Metadata & Structure)]
        S3[(S3-Compatible<br/>Content Storage)]
    end

    ArtifactStorage[(S3 Artifact Storage)]
    Architect --> Scribe
    Scribe --> Captain
    Captain -->|Upload Artifact| ArtifactStorage
    Captain -->|Deploy| K8sResources
    Captain -->|Provision database| DB
    Captain -->|Provision bucket| S3
    Captain -->|Provision realm| Keycloak[Keycloak<br/>Authentication]
Core Components
Architect
Architect serves as the source of truth for application models. It stores and manages all configuration that defines how
your ContentGrid application behaves. The concepts Architect manages are described in
the concepts section.
What Architect Stores:
- Domain Model: Entity definitions with attributes and relations
- Permission Model: Access control policies and rules
- Automation Configurations: Settings for external automation integrations
Versioning and History: Architect maintains a complete history of model changes, enabling audit trails and the
ability to understand how the application evolved over time.
API Access: Architect provides an API for retrieving application models. When you make changes through the
management interface, Architect persists them and makes them available to other components.
Scribe
Scribe transforms application models from Architect into deployable artifacts. It’s the compilation step that bridges
the gap between high-level model definitions and concrete implementation artifacts.
Artifact Generation Process:
- Fetch Model: Scribe retrieves the complete application model from Architect
- Generate Migrations: Analyzes model changes and generates SQL migration scripts (Flyway format)
- For new applications, generates CREATE TABLE statements
- For updates, compares current model to previous version and generates ALTER TABLE statements
- Ensures database schema stays synchronized with the model
- Compile Policies: Converts permission definitions into Rego policies for OPA
- Translates user-friendly permission rules into efficient policy evaluation code
- Generates policy packages with proper namespacing per application
- Generate OpenAPI Specification: Creates OpenAPI documentation for the REST API based on the model
- Package Artifact: Creates a ZIP file containing:
application-model.json: Complete model definitionmigrations/: SQL scripts for database schema changespolicies.rego: Access control policiesopenapi.yaml: API specificationmanifest.json: Metadata (organization, project, version, changeset, timestamps)
Artifact Metadata: The manifest includes traceability information—which changeset triggered the build, what version
of Scribe generated it, and when. This enables audit trails and troubleshooting.
Reproducibility: Given the same input model and version of Scribe, the output artifact is deterministic. This
ensures consistent behavior across environments and deployments.
Captain
Captain orchestrates the entire deployment process. It coordinates between Scribe, infrastructure provisioning, and
Kubernetes deployment, handling all the complexity of getting an application from model to running service.
Responsibilities:
- Application Configuration: Storing application settings
- IAM: Creating Realms, managing users, groups and attributes
- Artifact Management: Request artifact generation from Scribe and upload to shared artifact storage
- Infrastructure Provisioning: Provision databases, S3 buckets, and Keycloak realms for new applications
- Kubernetes Orchestration: Create and update Kubernetes resources (Deployments, Services, ConfigMaps, Secrets)
- Lifecycle Management: Handle application creation, updates, deletion
- Credential Management: Generate and distribute database credentials, S3 access keys, and authentication secrets
- Environment Configuration: Inject environment-specific configuration (database URLs, domain names, etc.)
Zero-Configuration Deployment: Captain abstracts away the complexity of Kubernetes and cloud infrastructure,
providing a simple “deploy this application” interface to the management platform. When you deploy an application,
Captain handles all the details automatically.
Deployment Flow
When you deploy an application, the Management Platform components work together to transform application models into
running services. The high-level flow involves:
- Deploy Request: User initiates deployment through the management interface
- Artifact Generation: Captain requests Scribe to generate an artifact from Architect’s model
- Infrastructure Deployment: Captain stores artifact, provisions infrastructure and coordinates Kubernetes
deployment
- Application Startup: Application Server fetches artifacts and begins serving
For detailed information about the deployment pipeline and lifecycle, see Deployment Pipeline.
Summary
The Management Platform provides a complete application lifecycle management system:
- Architect: Source of truth for application models
- Scribe: Transforms models into deployable artifacts with migrations and policies
- Captain: Orchestrates infrastructure provisioning and Kubernetes deployment
The platform abstracts away the complexity of cloud infrastructure and deployment orchestration, providing a simple
interface for defining and deploying applications. Its artifact-based approach ensures reproducible, auditable
deployments with full version history.
For details on how applications run after deployment, see Runtime Platform.
The Runtime Platform provides the infrastructure and services required to run, secure, and manage ContentGrid
applications. It integrates several components to handle authentication, authorization, policy enforcement, routing, and
frontend delivery.
The Runtime Platform is designed as a Kubernetes-native system. Components dynamically discover resources like
ConfigMaps, Secrets, and Services to route requests, enforce policies, and configure applications. This dynamic
discovery enables zero-configuration deployment of new applications—the platform automatically detects and integrates
them.
graph TB
    subgraph "Runtime Platform"
        Gateway[Gateway<br/>Entry Point & Routing]
        Keycloak[Keycloak<br/>Authentication]
        OPA[OPA<br/>Policy Evaluation]
        Solon[Solon<br/>Policy Collection]
        Navigator[Navigator<br/>Shared Frontend]
        Liaison[Liaison<br/>Config Service]
        Pathfinder[Pathfinder<br/>Ingress Management]
        Ingress[Kubernetes Ingress]
        RabbitMQ[(RabbitMQ<br/>Message Broker)]
        Slingshot[Slingshot<br/>Webhook Delivery]
        TokenMonger[TokenMonger<br/>Automation Auth]

        subgraph "Application Instance"
            AppServer[Application Server]
        end
    end

    Client --> Gateway
    Client --> Keycloak
    Gateway --> OPA
    Gateway --> AppServer
    Navigator -->|token exchange| TokenMonger
    Client --> Navigator
    Navigator --> |webbrowser request| Liaison
    AppServer --> Solon
    Solon --> OPA
    AppServer -->|publishes events| RabbitMQ
    RabbitMQ -->|delivers events| Slingshot
    Slingshot -->|HTTPS POST| External[External Systems]
    Pathfinder -.->|Creates| Ingress
    Ingress -.->|Routes to| Gateway
    External -->|token exchange| Tokenmonger
Core Components
Gateway
The Gateway serves as the entry point for all ContentGrid applications. It handles routing and
coordinates with authentication and authorization services.
Primary Responsibilities:
- Route requests to the appropriate application based on the request’s domain
- Enforce CORS policies configured per application
- Coordinate user authentication with Keycloak
- Communicate with Open Policy Agent (OPA) for policy evaluation
Dynamic Routing: The Gateway maintains a mapping from domains to application IDs by reading Kubernetes ConfigMaps.
When a request arrives for a specific domain name, the Gateway uses this mapping to determine the corresponding
application and routes to the appropriate Service for that application.
CORS Configuration: Each application’s CORS origins are configured in a ConfigMap. The Gateway reads these
configurations and merges CORS settings for both the API backend and the Navigator frontend, ensuring cross-origin
requests are properly handled.
Application Server
The Application Server serves dynamic REST APIs generated from application models. Each ContentGrid application runs as an instance of the same Application Server container, with behavior determined by the application artifact loaded at startup.
The Application Server follows a configuration-driven approach where a single container image serves all applications, enabling consistent operations and rapid iteration without code generation.
For complete details on the Application Server architecture and components, see Application Server.
Keycloak
Keycloak provides authentication and identity management for the platform. Each application has a corresponding realm in
Keycloak, though applications can share a realm (typically one realm per organization).
Key Functions:
- Authenticate users via OpenID Connect (OIDC)
- Store user attributes used in authorization policies
- Issue JWT tokens containing user identity and attributes
- Manage OAuth clients for both API access and frontend applications
User attributes stored in Keycloak (such as department, role, or clearance level) are included in JWT tokens and used by
applications when evaluating attribute-based access control policies.
Keycloak is an open source project. More information about Keycloak can be found on keycloak.org.
Open Policy Agent
OPA is a centralized policy engine that evaluates attribute-based access control (ABAC) policies for all applications in
the platform.
Key Functions:
- Evaluates Rego policies to determine authorization decisions
- Performs partial evaluation to return residual expressions when complete evaluation isn’t possible
- Receives policy bundles from Solon containing all application policies
- Queried by the Gateway before requests reach applications
When the Gateway receives a request, it queries OPA with user attributes and request context. OPA evaluates the relevant
policy and returns either a decision (allow/deny) or a residual expression that the Gateway encodes in a JWT for the
application to apply at the database level.
Open Policy Agent is an open source project. More information about Open Policy Agent can be found on openpolicyagent.org.
Solon
Solon collects Rego policy files from all applications and makes them available to OPA for policy evaluation.
Policy Collection:
- Discovers applications by querying Kubernetes Services with policy annotations
- Fetches policy files from application management endpoints via HTTP
- Bundles all policies together for OPA consumption
- Keeps OPA’s policy bundle up to date as applications are deployed or updated
Solon acts as the bridge between individual applications (which serve their own policy files) and the centralized OPA
instance (which needs all policies to evaluate authorization requests).
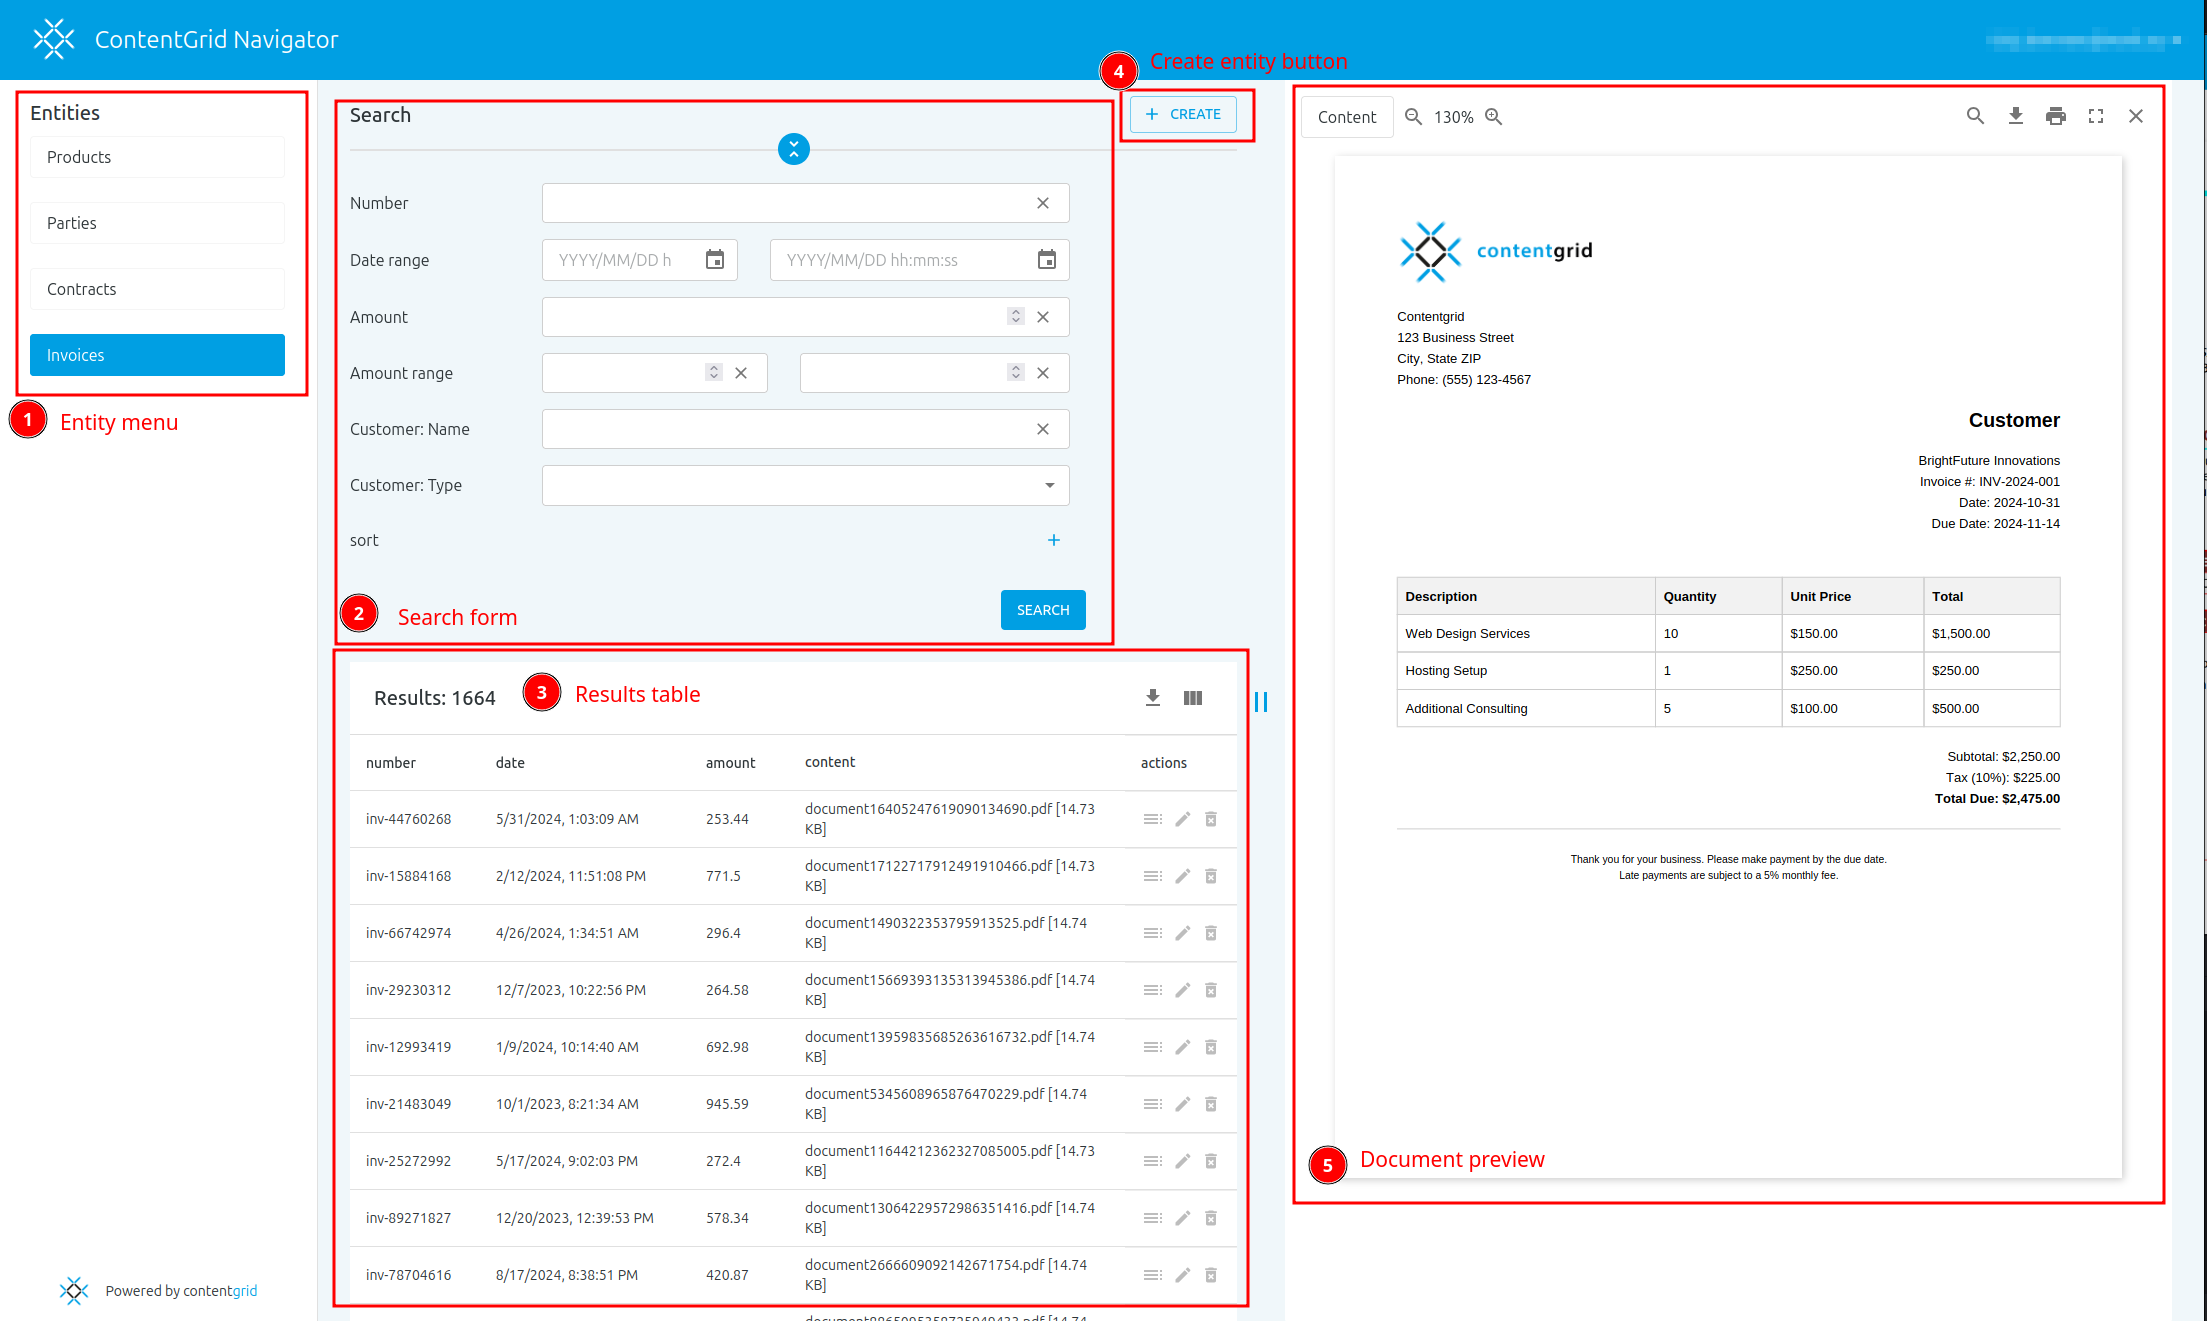
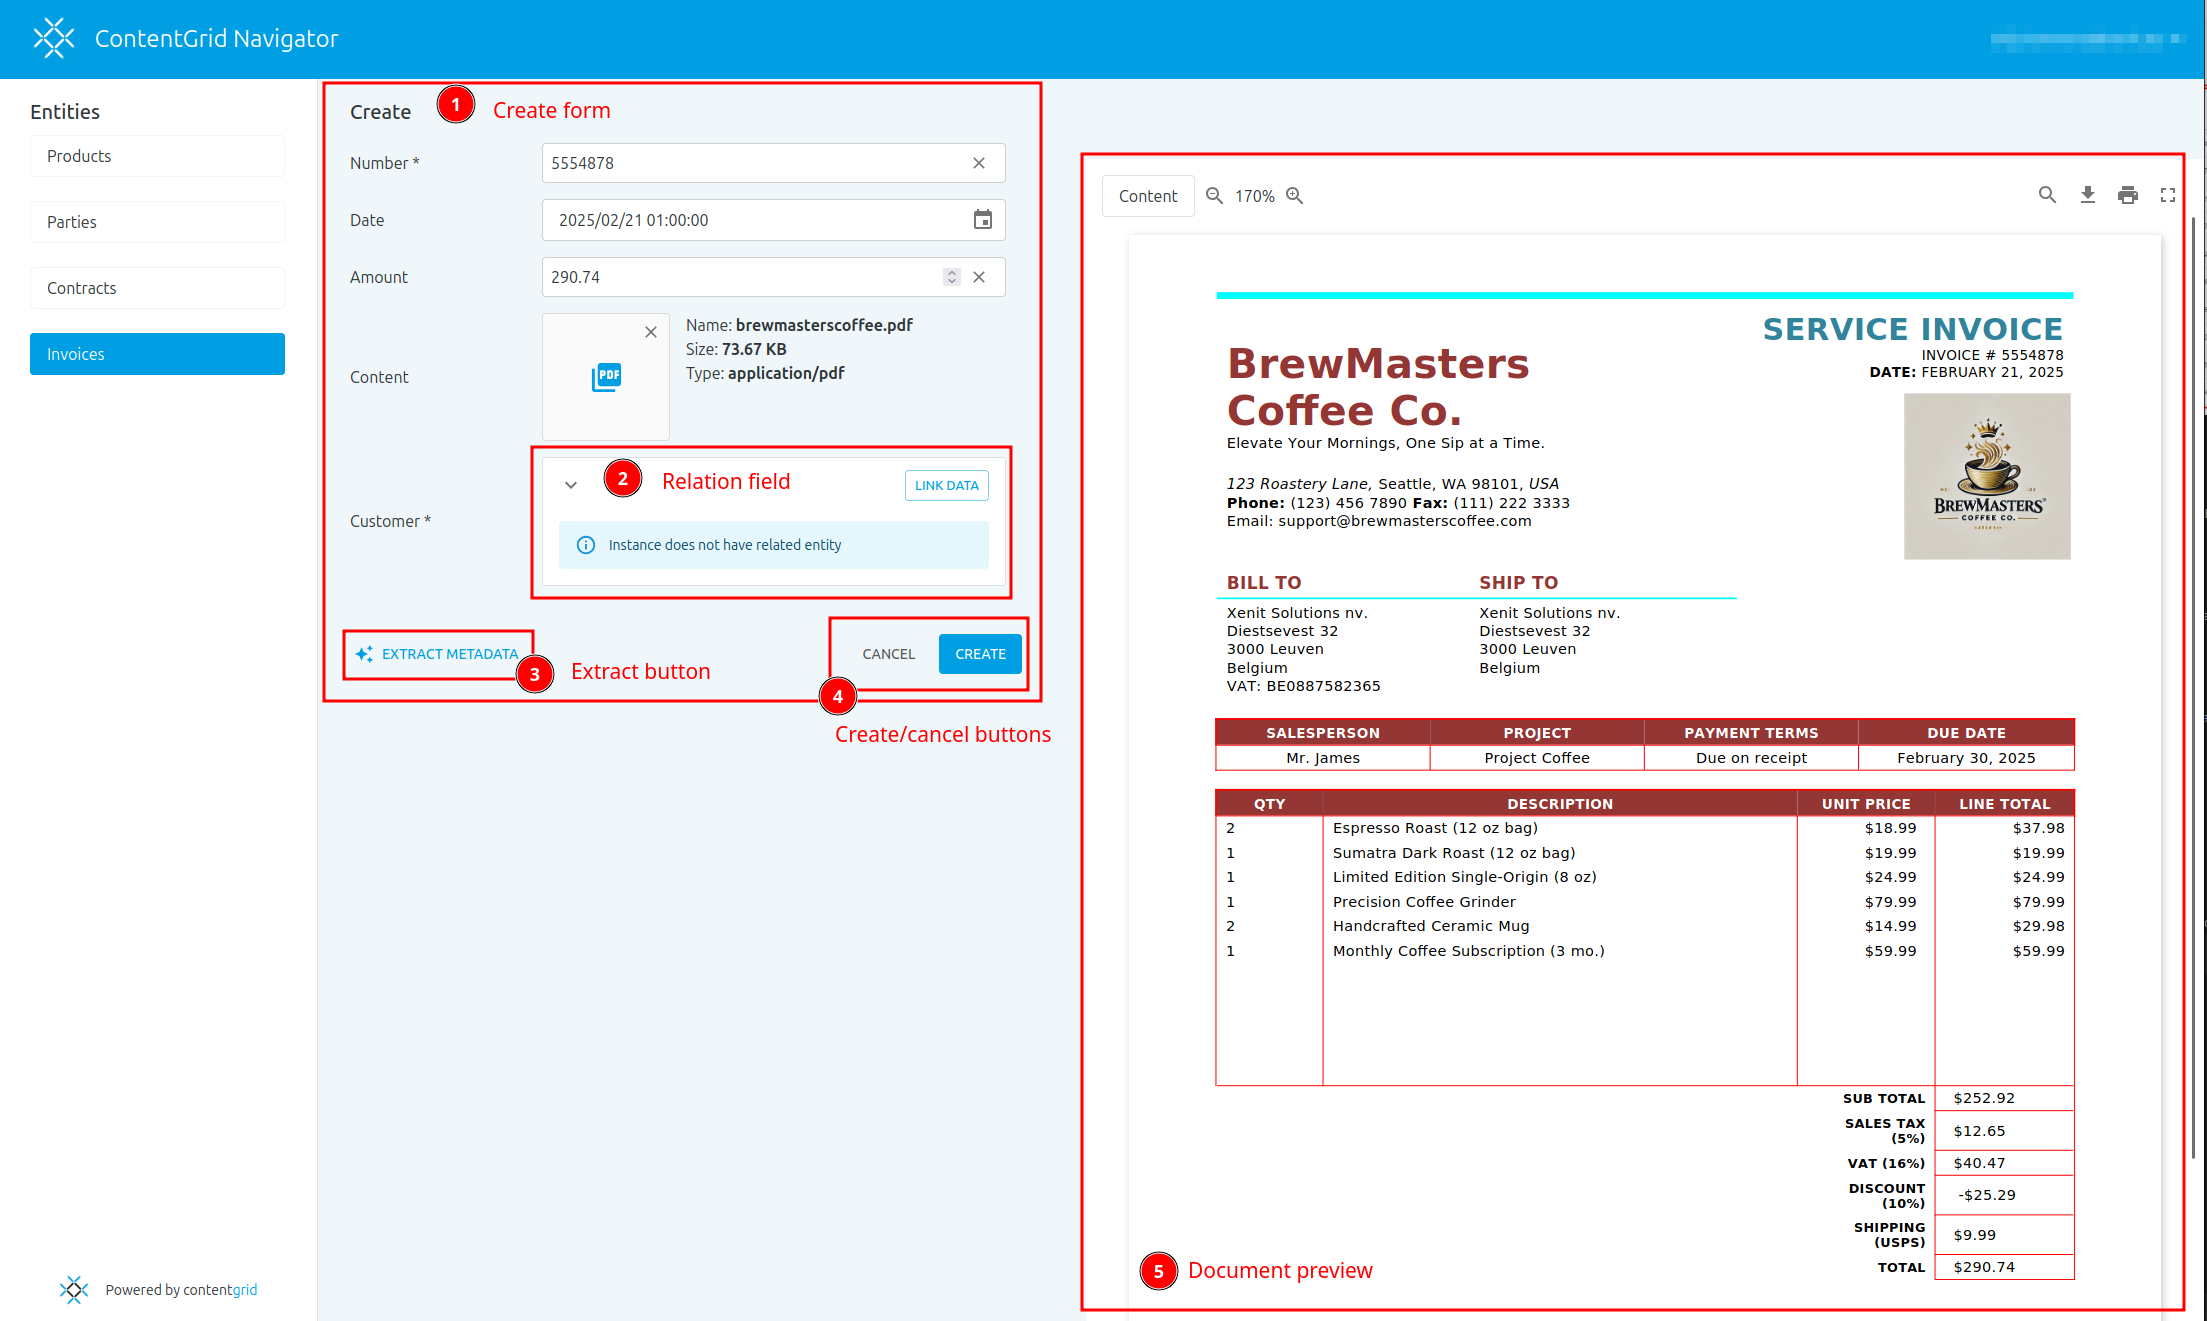
Navigator
Navigator is a shared React frontend application used by all ContentGrid applications. Rather than deploying separate
frontends per application, a single Navigator instance dynamically adapts to each application’s data model.
Adaptive Behavior:
- Discovers entities and available operations through HAL links
- Renders forms dynamically using HAL-FORMS templates
- Adapts to user permissions automatically (forms only show permitted actions)
- No application-specific code required—purely hypermedia-driven
Deployment Model: Pathfinder creates a separate Ingress resource for Navigator for each application, routing based
on domain. The Navigator instance then loads application-specific configuration from Liaison based on the request’s
Host header.
Liaison
Liaison serves configuration for Navigator on a per-application basis. It acts as a configuration service that provides
the necessary settings for Navigator to connect to the correct application and authentication realm.
Configuration Delivery:
- Serves Navigator configuration based on the domainname of the request
- Provides OIDC client ID and issuer URL for authentication
- Enables a single Navigator instance to serve multiple applications
Pathfinder
Pathfinder automatically creates and manages Kubernetes Ingress resources for applications. It watches ConfigMaps and
translates them into Ingress configurations, enabling external access to application services.
Two Deployment Variants:
- Pathfinder: Creates Ingress resources for application API backends
- Pathfinder for webapp: Creates Ingress resources for Navigator frontend
Resource Management:
- Reads ConfigMaps with domain routing configuration
- Creates Ingress resources with appropriate routing rules
- Coordinates with cert-manager for TLS certificate provisioning
Certificate Management: When Pathfinder creates an Ingress, cert-manager automatically provisions TLS certificates.
Pathfinder adds annotations to ConfigMaps indicating which cluster issuer to use, and cert-manager handles the
certificate lifecycle.
RabbitMQ
RabbitMQ serves as the message broker for the Runtime Platform, enabling an event-driven architecture where Application
Servers publish entity lifecycle events asynchronously. This decouples the core API request handling from downstream
consumers like webhook delivery.
Key Functions:
- Receives entity lifecycle events (create, update, delete) published by Application Servers
- Routes events to dedicated queues using a direct exchange with topic-based routing keys
- Provides durable quorum queues that replicate messages across nodes for data safety
- Handles failed deliveries with a dead-letter exchange for error handling and retry policies
Event Routing: Application Servers publish events to a direct exchange (contentgrid.apps) with routing keys that
separate event types (e.g., contentgrid.events for entity lifecycle events). Each consumer has its own quorum queue,
ensuring that slow or failing consumers do not affect others. Failed deliveries are retried a limited number of times
before being routed to a dead-letter exchange for inspection.
Optional Component: RabbitMQ is an optional component of the Runtime Platform. When RabbitMQ is not deployed,
event-driven features such as webhook delivery are unavailable, but the core API functionality remains fully operational.
RabbitMQ is an open source project. More information about RabbitMQ can be found on rabbitmq.com.
Slingshot
Slingshot is the outbound webhook delivery service. It consumes entity lifecycle events from RabbitMQ and delivers them
as signed HTTP POST requests to external webhook endpoints configured by application administrators.
Key Functions:
- Consumes events from RabbitMQ containing entity change notifications
- Matches events to webhook configurations based on entity type and trigger type
- Enriches event payloads with originator metadata (application ID and deployment ID)
- Signs every webhook delivery with an RS256 JWT for verifiable authenticity
- Delivers webhooks to external endpoints over HTTPS with a configurable timeout
Dynamic Configuration: Slingshot fetches webhook configurations from Application Server management endpoints at
runtime. When an event arrives, Slingshot looks up which webhook endpoints are registered for the matching entity and
trigger type, then delivers the event to each matching endpoint.
Signature Verification: Every webhook delivery includes a ContentGrid-Signature header containing an RS256-signed
JWT scoped to the endpoint URL. Receivers can verify the JWT signature by fetching Slingshot’s public signing keys from
the /.well-known/jwks.json endpoint (routed through the Gateway). Signing keys are rotated regularly, and previously
used keys remain available for verification during the transition period.
For more information on configuring webhooks, see the Webhooks guide and
Webhooks concepts.
TokenMonger
TokenMonger is the Authorization Service that manages secure token exchange between users, automations, and
ContentGrid applications. It enables the “small core, extensible ecosystem” architecture by allowing external automations
to authenticate users and access application data without receiving the user’s primary credentials.
Key Functions:
- Issues scoped tokens for automations to authenticate users and access application APIs
- Allows automations to access ContentGrid applications on behalf of a user, with at most the user’s privileges (delegated access)
Token Types: TokenMonger issues three types of tokens, each serving a specific authentication flow:
- User Extension Access Token: Allows a user to authenticate with an automation. Derived from the user’s application
access token, this token is scoped to a specific automation and does not grant access to ContentGrid applications.
- Extension Application Access Token: Allows an automation to access a ContentGrid application under its own identity,
without user context. Useful for background processing or autonomous operations.
- Extension Delegated Application Access Token: Allows an automation to access a ContentGrid application on behalf of
a user. The automation receives at most the user’s privileges. The token carries information about both
the user and the automation for audit purposes.
Gateway Integration: The user-facing token exchange endpoint is placed behind the Gateway, which resolves application
configuration and creates a gateway-issued JWT that TokenMonger consumes. Automation-facing endpoints are available
directly on the platform domain. The Gateway validates tokens issued to automations (EAAT and EDAAT) by verifying their
signature against TokenMonger’s JWKS endpoints, and applies the same OPA policy evaluation as for regular user requests.
For more information on the security model, see Architecture Principles and
Access Control.
Application Deployment
When an application is deployed to the Runtime Platform, several Kubernetes resources are created to integrate it with
the platform services.
Application Service
A Kubernetes Service makes the application accessible to the Gateway and other platform components. The Service is
labeled with the application ID and service type, enabling dynamic discovery.
Key Labels:
app.contentgrid.com/application-id: Unique identifier for the applicationapp.contentgrid.com/deployment-id: Unique identifier for the deploymentapp.contentgrid.com/service-type: Type of service (e.g., api, webapp)
Service Discovery: The Gateway uses these labels to discover Services. When routing a request, the Gateway queries
for Services matching the application ID determined from the domain mapping.
OPA Integration: The Service also includes an annotation (authz.contentgrid.com/policy-package) indicating the OPA
policy package location. This enables the platform to collect policies from applications.
Request Flow
Understanding how a request flows through the platform illustrates how these components work together.
sequenceDiagram
    autonumber
    participant Client
    participant Keycloak
    participant Gateway
    participant OPA as Centralized OPA
    participant App as Application Server
    participant DB as PostgreSQL
    Note over Client, Keycloak: Authentication Flow
    Client ->> Keycloak: Login (if no valid token)
    Keycloak -->> Client: JWT with user attributes
    Note over Client, DB: API Request Flow
    Client ->> Gateway: HTTPS Request + JWT
    Gateway ->> Gateway: Validate JWT signature
    Gateway ->> Gateway: Look up application by domain
    Gateway ->> OPA: Authorization query (JWT claims)
    OPA -->> Gateway: Allow/Deny + Residual expression
    Gateway ->> Gateway: Encode residual in new JWT
    Gateway ->> App: Forward request + JWT with residual
    App ->> App: Decode residual from JWT
    App ->> DB: Query with authorization filter
    DB -->> App: Filtered results
    App -->> Client: HAL JSON response
Step-by-Step:
- Authentication: Client authenticates directly with Keycloak and receives a JWT with user attributes
- Request with Token: Client makes HTTPS request to Ingress with JWT in Authorization header
- JWT Validation: Gateway validates JWT signature using Keycloak’s public keys
- Gateway Routing: Gateway maps domain to application ID
- Policy Evaluation: Gateway queries centralized OPA with user attributes from JWT
- Residual Encoding: OPA returns residual expression that Gateway encodes in a new JWT
- Application Processing: Gateway forwards request with JWT containing residual to Application Server
- Data Access: Application decodes residual, translates to SQL filter, and queries database
- Response: Application formats response as HAL JSON and returns through Gateway
Event-Driven Architecture and Webhook Delivery
Beyond synchronous API request processing, the Runtime Platform supports an event-driven architecture through RabbitMQ
and Slingshot. When entity lifecycle events occur (create, update, delete), Application Servers publish these events
asynchronously to RabbitMQ. This decouples the core API from downstream consumers, ensuring that webhook delivery and
other event-driven features do not impact API response times.
The following diagram illustrates how entity change events flow through the platform to external webhook endpoints:
sequenceDiagram
    autonumber
    participant App as Application Server
    participant RMQ as RabbitMQ
    participant Sling as Slingshot
    participant Ext as External System
    Note over App, RMQ: Event Publishing
    App ->> RMQ: Publish entity event<br/>(application_id, deployment_id, trigger, entity)
    Note over RMQ, Sling: Event Consumption
    RMQ ->> Sling: Deliver event from queue
    Note over Sling, Ext: Webhook Delivery
    Sling ->> Sling: Match event to webhook configs
    Sling ->> Sling: Enrich payload with originator metadata
    Sling ->> Sling: Sign payload with RS256 JWT
    Sling ->> Ext: HTTPS POST with signed payload<br/>(ContentGrid-Signature header)
    Ext ->> Sling: HTTP Response
    alt Failed delivery (after retries)
        Sling ->> RMQ: Nack message
        RMQ ->> RMQ: Route to dead-letter exchange
    end
Step-by-Step:
- Event Publishing: When a mutating operation occurs (e.g., an entity is created or updated), the Application Server
publishes an event to RabbitMQ. The event includes headers identifying the application, deployment, trigger type, and
entity.
- Event Routing: RabbitMQ routes the event to the appropriate consumer queue based on the routing key.
- Event Consumption: Slingshot consumes the event from its dedicated queue.
- Webhook Matching: Slingshot looks up webhook configurations matching the event’s entity type and trigger.
- Payload Enrichment: Slingshot merges originator metadata (application ID, deployment ID) into the event payload.
- Signature Generation: Slingshot generates an RS256-signed JWT scoped to the target endpoint URL.
- Webhook Delivery: Slingshot sends the enriched payload and JWT signature to the external endpoint via HTTPS POST.
- Error Handling: If delivery fails after the configured number of retries, the event is routed to a dead-letter
exchange for inspection and manual intervention.
Scaling and High Availability
The Runtime Platform is designed for horizontal scaling and high availability:
Application Servers: Scale horizontally by increasing replica count. Each replica is stateless (except for database
connections) and can handle requests independently. Kubernetes Services load balance across replicas.
Gateway: Runs as a highly available Deployment with multiple replicas. All replicas share the same configuration (
from ConfigMaps), and the Ingress load balances across them.
Keycloak: Can be deployed in clustered mode for high availability. Database-backed session storage enables failover
between instances.
Navigator and Liaison: Stateless services that scale horizontally. Liaison reads configuration from Kubernetes API
on each request (with caching), so all replicas have consistent configuration.
RabbitMQ: Can be deployed as a standalone instance for development or as a clustered deployment for high availability.
Quorum queues replicate messages across cluster nodes, providing data safety even if individual nodes fail.
Slingshot: Stateless service that scales horizontally. Each replica independently consumes from the RabbitMQ queue.
The only stateful dependency is the RabbitMQ connection; signing keys are loaded at startup and support rotation.
TokenMonger: Stateless service that scales horizontally behind the Gateway. Signing keys are loaded from the
filesystem (backed by Kubernetes Secrets) at startup, with support for runtime key rotation through retired key loading.
Database and Storage: PostgreSQL and S3 are external to the platform and have their own high-availability
mechanisms (e.g., PostgreSQL replication, S3 redundancy).
Operational Characteristics
Zero-Configuration Deployment: Adding a new application requires only creating the standard Kubernetes resources (
Deployment, Service, ConfigMaps, Secrets). The platform automatically discovers and integrates the application.
Independent Scaling: Each application scales independently. Heavy workloads on one application don’t affect others.
Resource Isolation: Each application has its own database, S3 bucket, and Keycloak realm (or shared by
organization). Resource limits prevent one application from affecting others.
Observability: Standard Kubernetes observability tools work out of the box. Platform components expose Prometheus
metrics, health check endpoints, and structured logs.
Summary
The ContentGrid Runtime Platform provides a Kubernetes-native infrastructure that:
- Automatically discovers and integrates applications through labels and dynamic service discovery
- Scales applications independently with horizontal scaling and load balancing
- Manages authentication and authorization through Keycloak and OPA
- Provides a shared Navigator frontend that adapts to any data model
- Handles TLS, routing, and CORS through Gateway and Ingress management
- Delivers entity lifecycle events to external systems via an event-driven architecture with RabbitMQ and Slingshot
- Enables secure extension integration through TokenMonger’s token exchange service
The platform’s design enables operational simplicity—deploying applications requires no platform configuration changes,
and standard Kubernetes operations handle scaling, updates, and failover.
Application Server
The ContentGrid Application Server is the core runtime component that serves dynamic REST APIs based on application
models. Each ContentGrid application runs as an instance of the same Application Server container image, configured with
application-specific artifacts.
The ContentGrid Application Server is developed in open source. The sources can be found
on https://github.com/xenit-eu/contentgrid-appserver.
Design Philosophy
The Application Server is built with a configuration-driven approach. A single shared
container image serves all applications. The only difference between different deployments is the application artifact (
model JSON, database
migrations, and policies) loaded at startup.
This approach provides several advantages:
- Deployment speed: No need to build new Docker images on model changes
- Consistent behavior: All applications run identical server code
- Simplified operations: One image to build, test, and deploy
Architecture Overview
graph TD
;
    subgraph "Application Server"
        REST[REST Layer] --> DOMAIN[Domain Layer];
        DOMAIN --> QUERY[Query Engine];
        DOMAIN --> CONTENT[Content Store];
        DOMAIN --> APPLICATION[Application Resolver];
    end

    subgraph "External Persistence"
        POSTGRES[PostgreSQL];
        STORAGE[Content Storage];
        ARTIFACT[Application Artifact];
    end

    QUERY --> POSTGRES;
    CONTENT --> STORAGE;
    APPLICATION --> ARTIFACT;
Components
The Application Server consists of several layered components, each with clear responsibilities and boundaries.
REST Layer
The REST Layer serves dynamic data endpoints based on the application model loaded from the artifact.
Responsibilities:
- Parse incoming HTTP requests and extract parameters
- Look up the application model and resolve entity definitions
- Follow relations to navigate between entities
- Parse authorization expressions from request context
- Format responses in HAL/HAL-FORMS format
- Serve HAL profile endpoints for entity metadata
- Handle upload and download of content
- Serve OpenAPI specifications
- Serve Rego policies for ABAC
Dynamic Endpoint Generation: When a request arrives for /invoices, the REST Layer looks up the “invoices” entity
definition. It then uses this definition to understand which attributes and relations exist,
generating the appropriate response structure on the fly.
Content Negotiation: The REST Layer supports multiple response formats based on the Accept header:
application/hal+json: Standard HAL responses with hypermedia linksapplication/prs.hal-forms+json: HAL-FORMS responses with action templatesapplication/schema+json: JSON Schema descriptions for entity profiles
Domain Layer
The Domain Layer provides business logic and abstracts data access patterns. It sits between the REST Layer and the
Query Engine/Content Store, enforcing business rules and model constraints.
Responsibilities:
- Expose logical operations: find, create, update, partial update, delete (for data); set/clear for to-one relations;
add/remove for to-many relations; find, update, delete for content
- Convert search filters and authorization rules into query expressions
- Enforce data constraints configured in the model (required fields, validation rules)
- Maintain audit information (created/modified timestamps and users)
- Coordinate transactions across multiple operations
Authorization Translation: When the REST Layer provides authorization rules from OPA, the Domain Layer translates
these into query expressions that the Query Engine can push down to the database. This ensures unauthorized data never
leaves the database—filtering happens at the SQL level.
Constraint Enforcement: The Domain Layer validates all data modifications against the model’s constraint definitions
before allowing changes to persist. This ensures data integrity independent of client validation.
Query Engine
The Query Engine translates the application model and query expressions into efficient database queries. It’s
responsible for all interactions with PostgreSQL.
Responsibilities:
- Dynamically construct SQL queries based on model definitions
- Apply pagination and sorting parameters
- Implement counting strategies (exact and estimated counts)
- Handle optimistic locking using row versions
- Push authorization filters down to SQL WHERE clauses
The query engine is implemented using JOOQ, a type-safe SQL query construction library for Java
that provides direct control over SQL while maintaining compile-time validation and type safety.
Dynamic Query Construction: Unlike traditional ORMs that use fixed entity classes, the Query Engine builds queries
at runtime based on the model. When the Domain Layer requests “all invoices where department=‘sales’”, the Query Engine
knows the invoices table structure from the model and constructs the appropriate SQL.
Counting Strategies: For large collections, exact counts can be expensive. The Query Engine implements fallback
strategies:
- Attempt an exact count with a timeout
- If timeout occurs, use PostgreSQL’s query planner statistics for an estimate
- Indicate in the response whether the count is exact or estimated
graph TD
    subgraph "REST Layer"
        REQUEST[Request Parameters]
        ABAC[ABAC Rules]
    end

    subgraph "Domain Layer"
        THUNX[Generate Query Expression]
        APP[Application Model]
    end


    REQUEST --> THUNX
    ABAC --> THUNX
    APP --> THUNX

    subgraph "Query Engine"
        SQL["Translate to SQL"]
    end

    THUNX -- Expression --> SQL
    THUNX -- Application --> SQL
    THUNX -- Entity --> SQL
    SQL --> POSTGRES[Execute Query on PostgreSQL]
Application Resolver
The Application Resolver provides model lookup for other components. It loads the application model from the artifact
and makes it available throughout the application lifecycle.
Responsibilities:
- Load application model from JSON artifact at startup
- Provide entity definitions to REST and Domain layers
- Validate model consistency and completeness
- Cache model in memory for fast access
Current Implementation: The Application Server currently uses a single-tenant model—one container runs one
application. The Application Resolver loads one model and always returns it. This design could support multi-tenancy in
the future by loading multiple models and routing between them, but the current focus is on simplicity and isolation.
Model Format: The application model is defined in JSON following a published schema. The model includes:
- Entity definitions with attributes and types
- Relation definitions (one-to-one, one-to-many, many-to-one)
- Constraint rules and validation
Content Store
The Content Store provides persistence and access for binary content objects (documents, images, PDFs, etc.). It
abstracts storage implementation, allowing different backends.
Capabilities:
- Read content by reference with support for HTTP Range requests
- Store new content objects and return references
- Remove content by reference
- Support transparent content encryption
Content References: The Content Store uses opaque references to identify content. These references are stored in the
database as part of entity attributes. The actual content bytes are stored in one of the implementations, referenced by
these
identifiers.
Range Request Support: For large files (videos, large PDFs), clients can request only specific byte ranges. The
Content Store translates these HTTP Range requests to the appropriate backend format, minimizing data transfer. Range
request support depends on the backend implementation - for example, S3-compatible storage supports native range
requests.
Implementations:
- S3ContentStore: Stores content in S3-compatible object storage (AWS S3, MinIO, etc.). This is the default option,
used in our own Runtime Platform.
- FileSystemContentStore: Stores content on local filesystem (useful for development)
- EncryptedContentStore: Wraps another ContentStore to add transparent encryption/decryption
Database Migrations
Database migrations are used to create the tables needed for a ContentGrid application, but also to migrate the database
schema from one version of the application to the next.
Database schema changes are managed using Flyway, a database migration tool. Migration scripts are included in the
application artifact and executed automatically during startup.
Migration Process:
- Application Server starts and loads the artifact
- Before serving requests, it runs Flyway migrations
- Flyway tracks which migrations have already been applied
- Only new migrations execute, enabling incremental schema changes
- Once migrations complete, the application begins serving traffic
Migration scripts are generated by Scribe based on model changes. When you add an entity or attribute, Scribe generates
a Flyway migration that creates or alters the corresponding table and columns.
ABAC Policy Integration
The Application Server integrates with Open Policy Agent (OPA) for attribute-based access control. Policies are written
in Rego and included in the application artifact.
Policy Lifecycle:
- Application Server loads Rego policies from artifact at startup
- Serves policies to Solon over HTTP
- For each request, the application extracts the residual expressions
- Application Server translates residual expressions to SQL filters
Residual Expressions: OPA’s partial evaluation feature is crucial for efficiency. When evaluating “user can see
invoices from their department,” OPA knows the user’s department but doesn’t know which invoices exist. It returns a
residual expression: invoice.department == "user's department". The Query Engine translates this to a SQL WHERE
clause, filtering at the database level.
This architecture means the application never loads unauthorized data—authorization filters are applied before data
leaves the database.
A more detailed description can be found in the section about access control.
Technology Stack
The Application Server leverages several proven technologies:
Query Construction: JOOQ provides type-safe SQL query construction in Java. Unlike
traditional ORMs, JOOQ gives
direct control over SQL while providing type safety and compile-time validation.
Web Framework: Spring Boot
and Spring MVC handle HTTP, dependency
injection, and application lifecycle. This
provides production-ready features like health checks, metrics, and configuration management.
Access Control: Custom query expression language (Thunx)
translates Open Policy Agent residual expressions into SQL. This enables
pushing authorization filters down to the database level.
JSON Processing: Jackson handles JSON serialization/deserialization,
including HAL and HAL-FORMS formatting.
Request Flow Example
Here’s how a request flows through the Application Server components:
Request: GET /invoices?department=sales&_sort=date,desc
-
REST Layer:
- Parses request: collection=invoices, filter={department:sales}, sort=[date,desc]
- Extracts JWT from Authorization header
- Queries for “invoice” entity definition (matching the
invoices path)
- Parses authorization expressions from JWT
-
Domain Layer:
- Receives: entity=invoice, filter={department:sales}, authorization={}
- Combines search filter with authorization expressions
- Requests paginated query from Query Engine
-
Query Engine:
- Generates SQL:
SELECT * FROM invoices WHERE department='sales' AND <auth filter> ORDER BY date DESC LIMIT 20
- Executes against PostgreSQL
- Returns result set
-
Domain Layer:
- Converts database rows to domain objects
- Returns to REST Layer
-
REST Layer:
- Formats as HAL JSON with _links and _embedded
- Adds HAL-FORMS templates for available actions
- Adds pagination links (next, prev, first)
- Returns HTTP response
Throughout this process, the only application-specific information is the model definition—the code executing these
steps is identical across all applications.
Query Performance: Database queries are the primary performance bottleneck. The Query Engine generates efficient SQL
that leverages indexes. Authorization filters are pushed down to SQL WHERE clauses, minimizing data transfer.
Memory Usage: The application model is cached in memory, but it’s typically small (kilobytes to low megabytes).
Content is streamed instead of entirely loaded in memory.
Horizontal Scaling: Application Servers are stateless (except database connections). Adding replicas linearly
increases throughput. Database connection pooling prevents connection exhaustion.
Summary
The ContentGrid Application Server provides a sophisticated runtime that generates complete REST APIs from application
models. Its layered architecture cleanly separates concerns:
- REST Layer handles HTTP and hypermedia formatting
- Domain Layer enforces constraints
- Query Engine translates models to efficient SQL
- Content Store abstracts binary content storage
- Application Resolver provides model definitions
The configuration-driven approach, combined with dynamic query construction and OPA integration, enables rapid
development and consistent operations while maintaining performance and security.
Access Control
ContentGrid uses Attribute-Based Access Control (ABAC) to enforce fine-grained permissions on data access. Instead of
folder-based permissions or role hierarchies, policies evaluate entity attributes and user attributes to make
authorization decisions.
Why ABAC?
Traditional ECM systems often tie permissions to folder structures. If a document is in a folder, you need permissions
on that folder. This approach has significant limitations:
- Artificial Organization: Data must be organized into folder hierarchies even when that doesn’t match the domain
model
- Rigid Permissions: Changing access requirements often requires reorganizing folders
- No Multi-Dimensional Access: Hard to express “users can see invoices from their own department AND invoices they
created”
- Weak Scalability: Permission checks traverse folder hierarchies, becoming expensive with deep nesting
ContentGrid replaces this with ABAC, where permissions are based on attributes:
- User Attributes: Department, role, clearance level, location, etc.
- Entity Attributes: Status, owner, creation date, sensitivity level, etc.
- Request Context: Operation (read/write/delete)
Example Policy: “Users can view invoices where invoice.department == user.department OR invoice.status == 'published'”
This policy doesn’t care about folder structures, as it evaluates attributes directly. Changing the invoice’s attribute
change the permissions, without having to explicitly change permissions.
Architecture Components
Open Policy Agent (OPA)
ContentGrid uses Open Policy Agent, an open-source policy engine, to evaluate access
control policies. Policies are written in Rego, OPA’s policy language.
Why OPA?
- Industry Standard: Widely adopted in cloud-native environments
- Declarative Policies: Rego is declarative—you specify what should be allowed, not how to check it
- Partial Evaluation: OPA can return residual expressions when it cannot fully evaluate a policy (crucial for
efficiency)
- Decoupled from Application: Policies live in Rego files, not scattered through application code
Rego Policies
Rego policies define authorization rules. Here’s a simplified example:
package contentgrid.invoices

import future.keywords

default can_read_invoice := false

# Allow reading invoices from the user's own department
can_read_invoice if {
    input.entity.department == input.auth.principal.department
}

# Allow reading published invoices regardless of department
can_read_invoice if {
    input.entity.status == "published"
}

allow if {
    input.request.method == "GET"
    # Path /invoices
    count(input.request.path) == 1
    input.request.path[0] == "invoices"
    can_read_invoice == true
}
When the application queries OPA, it provides:
- input.request.method: The HTTP method (GET, POST, PUT, DELETE)
- input.request.path: The path being accessed
- input.auth.principal: User attributes from the JWT
- input.entity: Entity object with attributes and relations (when checking a specific record)
OPA evaluates all allow rules. If any rule evaluates to true, access is granted.
Partial Evaluation
The key to ABAC efficiency in ContentGrid is OPA’s partial evaluation feature.
The Problem: When a user requests /invoices, the application needs to return only invoices the user can access.
Naively, you might:
- Load all invoices from the database
- For each invoice, query OPA: “Can this user access this invoice?”
- Filter out invoices where OPA says “no”
This is catastrophically inefficient. For 10,000 invoices, you’d make 10,000 OPA queries and transfer 10,000 invoices
from the database just to filter most of them out.
The Solution: Partial evaluation allows OPA to evaluate policies with incomplete information.
The application queries OPA: “The user wants to see invoices. What filter should I apply?”
OPA evaluates the policy but doesn’t know which invoices exist. It returns a residual expression, a simplified
policy that only contains the parts that could not be fully evaluated:
input.entity.department == "sales" OR input.entity.status == "published"
The application translates this residual expression to a SQL WHERE clause:
SELECT *
FROM invoices
WHERE department = 'sales'
   OR status = 'published'
Now only authorized invoices leave the database. One OPA query, efficient SQL filtering and minimal data transfer.
Architecture
Centralized OPA
ContentGrid currently uses a shared OPA instance for all applications deployed in the Runtime Platform.
Components
- Gateway: Entry point for all requests, responsible for policy enforcement
- Centralized OPA: Shared OPA instance that evaluates policies for all applications
- Solon: Service that collects Rego policy files from all applications and bundles them for OPA
- Application: Serves its policy file and receives residual expressions from the Gateway
Request Flow
sequenceDiagram
    autonumber
    participant Client
    participant Gateway
    participant OPA as Centralized OPA
    participant Solon
    participant App as Application
    participant DB as Database
    Note over Solon, App: Policy Distribution Phase
    App ->> Solon: Serve policy file (HTTP endpoint)
    Solon ->> Solon: Bundle all policies
    OPA ->> Solon: Download policy bundle
    Note over Client, DB: Request Processing Phase
    Client ->> Gateway: HTTP Request
    Gateway ->> OPA: Authorization query
    OPA -->> Gateway: Allow/Deny/Residual expression
    Gateway ->> Gateway: Encode residual in JWT
    Gateway ->> App: Forward request + JWT with residual
    App ->> App: Decode residual from JWT
    App ->> DB: Query with residual as filter
    DB -->> App: Filtered results
    App -->> Client: Response
How It Works:
- Policy Distribution: Solon collects Rego policies from all applications via HTTP endpoints and bundles them for
the centralized OPA
- Request Processing: When a request arrives, the Gateway queries the centralized OPA for authorization
- Residual Encoding: OPA returns a residual expression that the Gateway encodes in a JWT
- Application Processing: The application decodes the residual from the JWT and applies it as a SQL filter
- Data Retrieval: Only authorized data is retrieved from the database
Policy Evaluation in Practice
The examples below illustrate key concepts for readers. While payloads may differ from real implementations, the
underlying principles remain the same.
For collection queries (e.g., “What invoices can this user see?”), the application provides partial information:
{
  "input": {
    "method": "GET",
    "entity": "invoices",
    "user": {
      "id": "user-123",
      "department": "sales",
      "role": "employee"
    }
  }
}
Notice entity is missing—the application doesn’t know which invoices exist yet. OPA performs partial evaluation
and returns a residual expression:
{
  "result": {
    "or": [
      {
        "eq": [
          {
            "ref": [
              "entity",
              "department"
            ]
          },
          "sales"
        ]
      },
      {
        "eq": [
          {
            "ref": [
              "entity",
              "status"
            ]
          },
          "published"
        ]
      }
    ]
  }
}
The application translates this to SQL. The exact translation mechanism uses an internal query expression language
called Thunx that
maps to SQL WHERE clauses.
Policy Development Workflow
Policies are defined in the Management Platform alongside the data model:
- Define Permissions: In the Management Platform, you define permission rules as part of the application model
- Generate Rego: Scribe generates Rego policies from the permission definitions
- Bundle Policies: Rego policies are included in the application artifact
- Deploy: When the application starts, it makes them available for OPA (via Solon)
- Enforce: The Gateway queries OPA for every request, enforcing the policies
Policy changes follow the same deployment pipeline as model changes, and are deployed in tandem. Update permissions,
regenerate artifact, redeploy application.
Query-Level Filtering: Pushing authorization filters to SQL ensures only authorized data leaves the database. This
is dramatically more efficient than application-level filtering.
OPA Response Time: OPA policy evaluation is fast (microseconds to low milliseconds).
Database Indexes: Authorization filters often involve specific columns (e.g., department, owner). Proper indexes
on these columns ensure efficient query execution.
Security Benefits
Defense in Depth: Authorization happens at multiple layers:
- OPA evaluates policies before queries execute
- Database enforces SQL filters (data never loaded without authorization)
Principle of Least Privilege: ABAC naturally supports least-privilege models. Users only see data matching their
attributes, and policies can be as granular as needed.
Dynamic Permissions: Attribute changes immediately affect permissions—no cache invalidation needed. If a user
changes departments, their access automatically reflects the new department.
Summary
ContentGrid’s Attribute-Based Access Control provides fine-grained, efficient authorization:
- Flexible Policies: Based on entity and user attributes, not artificial folder hierarchies
- Efficient Enforcement: Partial evaluation pushes authorization filters to SQL
- Centralized Architecture: Shared OPA instance with policy collection via Solon
- Declarative Rego: Policies are readable, maintainable, and separate from application code
ABAC enables expressing complex authorization requirements naturally while maintaining query performance through
intelligent filter pushdown.
Data Storage & Encryption
ContentGrid separates structured metadata from binary content, storing each optimally. Metadata lives in PostgreSQL,
while content (documents, images, videos) is stored in S3-compatible object storage.
Storage Architecture
PostgreSQL for Metadata
Each ContentGrid application has its own PostgreSQL database. The schema is generated automatically from the application
model:
- Entities → Tables: Each entity in your model becomes a table
- Attributes → Columns: Entity attributes map to columns with appropriate types
- One-to-x Relations → Foreign Keys: Relations between entities use foreign key constraints
- Many-to-many Relations → Join Tables: Many-to-many relations between entities use join tables
This direct mapping enables leveraging PostgreSQL’s full capabilities:
- Indexes: Standard B-tree and other indexes for efficient queries
- Constraints: Check constraints, unique constraints, and foreign keys enforce data integrity
- Transactions: Full ACID guarantees for all operations
Migration Management: Flyway manages schema migrations. When the model changes, Scribe generates SQL migration
scripts that execute automatically on deployment.
S3-Compatible Storage for Content
Binary content is stored in S3-compatible object storage (AWS S3, MinIO, Ceph, etc.). Each application has dedicated
buckets. This ensures:
- Isolation: Applications cannot access each other’s buckets
- Scalability: Object storage scales independently of compute and database
Content References: The database stores only references (unique identifiers) to content, not the content itself.
When the application needs content, it retrieves it from S3 using the reference.
Immutability: Content objects are never overwritten. Updating content creates a new object with a new reference. The
old content remains until explicitly deleted, enabling:
- Safe Backups: Backup S3 buckets without worrying about in-flight modifications
- Recoverability: Old content versions can be retained for recovery or audit
- Atomic Updates: Database transactions can commit content reference changes without coordinating with S3
Content Encryption
ContentGrid provides transparent encryption at rest for content stored in S3. Encryption and decryption happen
automatically—applications and users don’t need to manage keys or modify their workflows.
Content is encrypted with AES-128 in CTR mode.
Encryption Goals
The encryption architecture is designed to meet several requirements:
- Strong Security: Content encrypted using standard cryptographic primitives
- Key Protection: Encryption keys managed securely with database access controls
- Enable After Deployment: Encryption can be enabled for applications with existing unencrypted content
- Key Rotation: Encryption keys can be rotated on an individual basis without re-encrypting all content
- Application Isolation: Each application uses different encryption keys
- Range Request Support: Clients can request parts of files (HTTP Range) without decrypting the entire file
Data Encryption Keys
ContentGrid encrypts content at rest using Data Encryption Keys (DEKs). Each content object gets its own unique
symmetric key, ensuring strong isolation between content objects.
flowchart LR
    DEK[Data Encryption Key<br/>Per Content Object]
    Content[Content<br/>Binary Data]
    DEK -->|Encrypts| Content
How It Works:
- Unique Keys: Each content object has its own 128-bit AES symmetric key (DEK)
- Strong Isolation: Compromising one DEK does not affect other content objects
- Local Encryption: Content encryption and decryption happen in the application using the DEK (no external service
calls)
- Database Storage: DEKs are stored in the database alongside content metadata
Note: Future enhancements will add Key Encryption Keys (KEKs) stored in Hardware Security Modules (HSMs) or cloud
Key Management Services (KMS) to provide an additional layer of protection for DEKs. See the Future Enhancements section
below.
Encryption Process
When content is uploaded:
flowchart TD
    Content[Content Upload]
    GenDEK[Generate DEK]
    EncryptContent[Encrypt Content with DEK]
    StoreContent[Store Encrypted Content in S3]
    StoreKey[Store DEK in Database]
    Content --> GenDEK
    GenDEK --> EncryptContent
    EncryptContent --> StoreContent
    GenDEK --> StoreKey
- Generate DEK: Application generates a random symmetric key (AES-128)
- Encrypt Content: Application encrypts content using the DEK
- Store Content: Encrypted content is stored in S3
- Store DEK: DEK is stored in the database alongside content metadata
Decryption Process
When content is downloaded:
flowchart TD
    FetchKey[Fetch DEK from Database]
    FetchContent[Fetch Encrypted Content from S3]
    DecryptContent[Decrypt Content using DEK]
    Return[Return Content to Client]
    FetchKey --> DecryptContent
    FetchContent --> DecryptContent
    DecryptContent --> Return
- Fetch DEK: Application retrieves DEK from database
- Fetch Encrypted Content: Application retrieves encrypted content from S3
- Decrypt Content: Application decrypts content locally using the DEK
- Return to Client: Decrypted content is sent to the client
Key Storage and Management
Data Encryption Keys (DEKs):
- Stored in the database in a dedicated table
- Each DEK is a 128-bit AES symmetric key
- Each content object has its own unique DEK
- Access controlled through database permissions and connection authentication
- DEKs are associated with their corresponding content references
Key Rotation
To rotate a DEK (e.g., upgrading encryption algorithm or if a DEK is compromised):
- Fetch and decrypt the old content using the old DEK
- Generate a new DEK
- Encrypt the content with the new DEK
- Store the new encrypted content in S3
- Update the database with the new DEK and content reference
DEK rotation is performed on a per-object basis and is typically only needed when upgrading cryptographic algorithms or
responding to a security incident.
Range Request Support
HTTP Range requests allow clients to request specific byte ranges of a file (e.g., “bytes 1000-2000”). This is essential
for:
- Video Seeking: Jump to a timestamp without downloading the entire video
- Large PDFs: Load only visible pages
- Parallel Downloads: Split large files across multiple connections
Encryption Challenge: Not all encryption modes support decrypting arbitrary byte ranges—some require decrypting from
the beginning.
Solution: ContentGrid uses block cipher modes that support random access (e.g., AES-CTR). The encryption
implementation:
- Calculates which encrypted blocks contain the requested byte range, and adjust the counter for that
- Fetch only the exact amount of requested data from S3 (using S3 range requests)
- Pads the downloaded data to align to the correct block size
- Decrypts the blocks
- Trims to the exact requested range
- Returns to the client
No additional data needs to be fetched. There is no need to decrypt the entire file, only a small amount of extra
decryption is performed to align with block boundaries.
Security Considerations
Data Confidentiality:
- Content is encrypted using strong symmetric algorithms (AES-128)
- Each content object has a unique encryption key (DEK)
- DEKs are stored in the database with access controlled through database permissions
- Encrypted content in S3 is protected from unauthorized access at the storage layer
- Database connections are authenticated and encrypted
Data Integrity:
- Immutability prevents accidental overwrites
Access Control:
- Database access controls restrict which services and users can access DEKs
- Application servers authenticate to the database using service credentials
Defense in Depth:
- Content encrypted at rest (this architecture)
- Data encrypted in transit (TLS)
- Access control enforced at query level (ABAC)
- Database connections authenticated and encrypted
- Database encryption at rest can provide an additional protection layer
Encryption Overhead:
Modern CPUs have AES hardware acceleration (AES-NI), making symmetric encryption very fast. The overhead for
encrypting/decrypting content is minimal—typically less than 100 MB/s of throughput impact.
Range Requests:
Range requests with encryption decrypt slightly more data (to align with block boundaries), but the overhead is small.
For a 1 KB range request, you might decrypt 1-2 KB. This is negligible compared to fetching and decrypting the entire
file.
Future Enhancements
Envelope Encryption with Key Encryption Keys
ContentGrid’s encryption architecture is designed to support envelope encryption (also called two-level encryption),
a standard technique used by AWS KMS, Google Cloud KMS, HashiCorp Vault, and other enterprise systems.
In envelope encryption, a Key Encryption Key (KEK) stored in a Hardware Security Module (HSM) or cloud Key
Management Service (KMS) is used to encrypt the DEKs before storing them in the database. This provides additional
security benefits:
- Enhanced Key Protection: DEKs are encrypted before storage, with KEKs never leaving the HSM/KMS
- Audit Logging: All key operations logged in the KMS for compliance and security monitoring
- Efficient Key Rotation: Rotating the KEK only requires re-encrypting small DEKs, not the entire content
The implementation will be backward compatible with existing encrypted content. When enabled, new content will use
envelope encryption, and existing DEKs can be migrated in the background without service interruption.
Summary
ContentGrid’s storage architecture separates structured metadata (PostgreSQL) from binary content (S3), optimizing each
for its purpose:
- PostgreSQL: Provides ACID transactions, relational integrity, and efficient querying for metadata
- S3: Provides scalable, durable storage for large binary content
- Content Encryption: Protects content at rest using unique Data Encryption Keys (DEKs) for each object
- Range Request Support: Enables efficient access to large files without sacrificing encryption
Encryption is transparent to applications and users—no code changes or workflow modifications required. The architecture
balances strong security with operational simplicity and performance.
Deployment Pipeline
ContentGrid applications are deployed through a fully automated pipeline that transforms high-level application models
into running services. The deployment process is managed by the Management Platform and executed in the Runtime
Platform.
Deployment Overview
The deployment pipeline bridges two environments:
Management Platform: Where you define application models, configure settings, and
initiate deployments. This is the control plane.
Runtime Platform: Where applications actually run, serving APIs to end-users. This is the
data plane.
The pipeline ensures consistent, repeatable deployments with zero manual intervention required for the deployment
mechanics.
The deployment pipeline is orchestrated by three Management Platform components:
- Architect: Source of truth for application models (entities, permissions, configurations)
- Scribe: Transforms models into deployable artifacts (migrations, policies, OpenAPI specs)
- Captain: Orchestrates infrastructure provisioning and Kubernetes deployment
For complete details on how these components work together, their responsibilities, and operational characteristics,
see Management Platform.
Deployment Architecture
flowchart TD
    S3Artifact[S3 Artifact Bucket]

    subgraph Management Platform
        Arch[Architect<br/>Model Definition]
        Scr[Scribe<br/>Artifact Generator]
        Cap[Captain<br/>Orchestrator]
        Arch --> Scr
        Cap -->|Request Artifact| Scr
        Scr -->|Generated ZIP| Cap
    end

    subgraph Runtime Platform
        K8s[Kubernetes API]
        AS[Application Server]
    end

    CB[(S3 Content Bucket)]
    DB[(PostgreSQL Database)]
    Cap -->|Upload Artifact| S3Artifact
    Cap -->|Create/Update Resources| K8s
    K8s -->|Deploy| AS
    AS -->|Fetch Artifact| S3Artifact
    AS -->|Metadata| DB
    AS -->|Content| CB
    AS -->|Serve API| Users[Clients]
Deployment Lifecycle
The end-to-end deployment process follows these steps:
sequenceDiagram
    autonumber
    participant Architect
    participant Scribe
    participant Captain
    participant S3 as S3 Artifact Storage
    participant CB as S3 Content Bucket
    participant K8s as Kubernetes
    participant App as Application Server
    Captain ->> Scribe: Request artifact for application X
    Scribe ->> Architect: Fetch application model
    Architect -->> Scribe: Model JSON
    Scribe -->> Captain: ZIP (model.json, migrations/, policies.rego)
    Captain ->> S3: Upload artifact ZIP
    Captain ->> K8s: Create/Update Deployment/Service/ConfigMaps/Secrets
    K8s -->> App: Start application server pod
    App ->> S3: Fetch artifact ZIP
    App ->> App: Unpack artifact (model, migrations, policies)
    App ->> App: Run DB migrations, Serve Rego files
    App -->> Users: Serve API for application X
Step-by-Step Breakdown
1. Artifact Request
Captain initiates deployment by requesting Scribe to generate an artifact for a specific application. This happens when
the user triggers a deployment via the Console.
2. Model Retrieval
Scribe fetches the current application model from Architect. The model includes all entity definitions, permissions,
constraints, and configuration.
3. Artifact Generation
Scribe processes the model:
- Migration Generation: Compares the current model to the previous version (if it exists) and generates SQL DDL
statements to migrate the schema.
- Policy Compilation: Converts permission rules (defined in a user-friendly format in Architect) into Rego policies
that OPA understands.
- Model Serialization: Serializes the model to JSON in the format expected by the Application Server.
- Manifest File: Containing information about the artifact.
- Packaging: Bundles everything into a ZIP with a consistent structure.
4. Artifact Upload
Captain uploads the artifact to a shared artifact storage bucket (S3). The artifact is stored with a path including the
application ID and version, enabling:
- Rollback: Previous artifacts remain available for reverting deployments
- Audit: Complete history of what was deployed when
- Distribution: All Application Server replicas fetch from the same location
5. Infrastructure Provisioning
For new applications, Captain provisions:
- PostgreSQL Database: Creates a new database with credentials stored in a Kubernetes Secret
- S3 Content Bucket: Creates a bucket with appropriate access policies
- Keycloak Realm: Creates or configures a realm for authentication, sets up OIDC clients
6. Kubernetes Resource Creation
Captain creates or updates Kubernetes resources:
Deployment:
- Specifies the Application Server container image (same for all applications)
- Configures environment variables pointing to the artifact location
- Sets resource limits (CPU, memory)
- Configures health check endpoints
Service:
- Exposes the Application Server pods to the Gateway
- Labels with application ID and service type for discovery
ConfigMaps:
- Gateway configuration (domains, CORS settings)
- Webapp configuration (OIDC settings)
Secrets:
- Database credentials
- S3 bucket access keys
- Gateway authentication credentials for Keycloak
7. Application Server Startup
Kubernetes starts the Application Server pod(s):
Init Phase:
- Application Server downloads the artifact from S3
- Unpacks the artifact to the local filesystem
- Runs Flyway migrations against the database
Runtime Phase:
- Loads the application model into memory
- Starts the HTTP server
- Registers health check endpoints
- Begins serving API requests
The init phase ensures the database schema matches the model before serving traffic. If migrations fail, the pod won’t
become ready, and Kubernetes won’t route traffic to it.
8. Service Readiness
Once health checks pass, Kubernetes marks the pod as ready and begins routing traffic.
Artifact Structure
A typical artifact has this structure:
application-artifact.zip
├── manifest.json                    # Metadata
├── application-model.json           # Model definition
├── policies.rego                    # Access control policies
└── migrations/                      # Flyway migrations
    ├── V1__initial_schema.sql
    ├── V2__add_invoices.sql
    └── V3__add_status_column.sql
manifest.json:
{
  "organizationId": "org-123",
  "organizationName": "Acme Corp",
  "projectId": "proj-456",
  "projectName": "Invoice Management",
  "version": "1.2.3",
  "changeset": "abc123def456",
  "timestamp": "2026-01-28T10:30:00Z",
  "scribeVersion": "2.1.0"
}
application-model.json:
The model JSON follows a published schema and includes complete entity definitions, attributes, relations, and
constraints. This is the single source of truth for the Application Server’s runtime behavior.
policies.rego:
Rego policies define authorization rules. These are loaded by OPA and queried by the Application Server for every
request.
migrations:
Flyway migration scripts are numbered sequentially. Flyway tracks which migrations have executed in a special database
table (flyway_schema_history), ensuring each migration runs exactly once.
Update Strategy
When updating an existing application:
Update:
- Captain deletes the old Deployment
- Captain creates a new Deployment with the updated artifact
- Kubernetes starts new pods with the updated artifact
- New pods run migrations (only new migrations execute)
- Health checks pass, new pods become ready
Database Migrations:
- Flyway migrations are forward-only—there are no automatic rollbacks
- Migrations should be backward-compatible when possible (e.g., adding nullable columns)
- Breaking changes require coordination between schema and code deployments
Rollback:
- Captain can redeploy a previous artifact version
- Even if the database migrations ran, the old schema is still available, and the old version of the model will still run
Deployment Observability
Health Checks:
Application Server exposes health endpoints:
/actuator/health/liveness: Is the process alive?/actuator/health/readiness: Is the application ready to serve traffic?
Kubernetes uses these for liveness probes (restart if unhealthy) and readiness probes (route traffic only when ready).
Logs:
All components log to stdout/stderr, collected by Kubernetes:
- Captain logs deployment activities and decisions
- Application Server logs startup, migrations, and request handling
- OPA logs policy evaluation (if enabled)
Centralized logging (e.g., Elasticsearch, Loki) aggregates logs for analysis.
Metrics:
Application Server exposes Prometheus metrics:
- Request counts and latencies
- Database query performance
- OPA policy evaluation times
- Content storage access patterns
Monitoring dashboards provide visibility into application behavior.
Deployment Security
Principle of Least Privilege:
- Captain has credentials to provision infrastructure but not to access application data
- Application Server has credentials to access its own database and bucket, but not others
- Keycloak realms isolate authentication between organizations
Secret Management:
- Kubernetes Secrets store sensitive credentials
- Secrets are injected as mounted files
- Secrets are not included in artifacts or logged
Artifact Integrity:
- Artifacts are versioned and immutable once created
- Only Captain can upload artifacts to the shared bucket
Summary
The ContentGrid deployment pipeline provides a fully automated path from application model to running service:
- Artifact Generation: Scribe transforms models into deployable artifacts with migrations and policies
- Orchestration: Captain provisions infrastructure and coordinates Kubernetes deployments
- Observability: Health checks, logs, and metrics provide visibility into deployment status and application health
The pipeline’s design enables rapid iteration—model changes deploy quickly and consistently. The use of a shared
container image simplifies operations while maintaining application isolation through configuration and infrastructure
separation.